
Windows 11 is fast becoming the default Windows installation and upgrading can cause slowdowns and performance issues. This guide covers all the things i have come across to make your life easier and speed up Windows 11 for a better experience.
Step 1: Update your PC
1. Open the Settings App and go to “Windows Update => Check for updates “.

If any update is available, install it and then restart the PC.
Step 2: Change Power Mode
1. Open the Settings App and navigate to “System => Power & battery “.

2. Click on the “Power Mode” option and select the “Balanced” option from the list.

Step 3: Disable Restartable Apps
1. Navigate to “Settings => Accounts => Sign-in options “.
2. Toggle off the “Automatically save my restartable apps and restart them when I sign back in” option.
Step 4: Disable Startup Programs
1. Open the Settings App and navigate to “Apps => Startup“.
2. Turn off all the apps that you don’t want to run during the startup.

Step 5: Delete Temporary Files
1. Press the Windows key + R. Type %temp% and click OK.
2. Select all the temporary files and delete them. Skip those you cannot.
Step 6: Uninstall Unwanted Software
1. Navigate to “Settings => Apps => Installed Apps“.


2. Remove all the unwanted apps one by one. Click on the app and select “Uninstall“.
Step 7: Disable Game Mode
1. Navigate to “Settings => Gaming => Game Mode“.

2. Toggle off the “Gaming Mode” option.

Step 8: Disable Animation and Visual Effects
1. Navigate to “Settings => Personalization => Colors”.

2. Toggle off the “Transparency effects” option.

3. After that, go to the “Accessibility” section and select the “Visual Effects” option.

4. Toggle off the “Transparency effects” and “Animation effects” options.

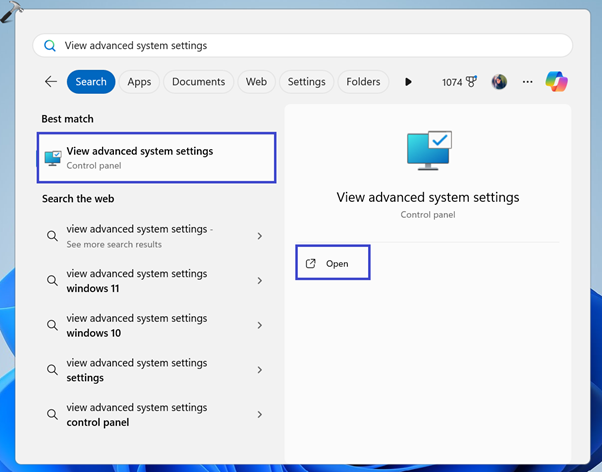
5. Afterwards, search “View advanced system settings” in the search menu. Click “Open”.
6. A System Properties dialog box will appear. Under the Performance section, click “Settings“.

7. A Performance Options dialog box will appear. Select the “Adjust for best performance” option.
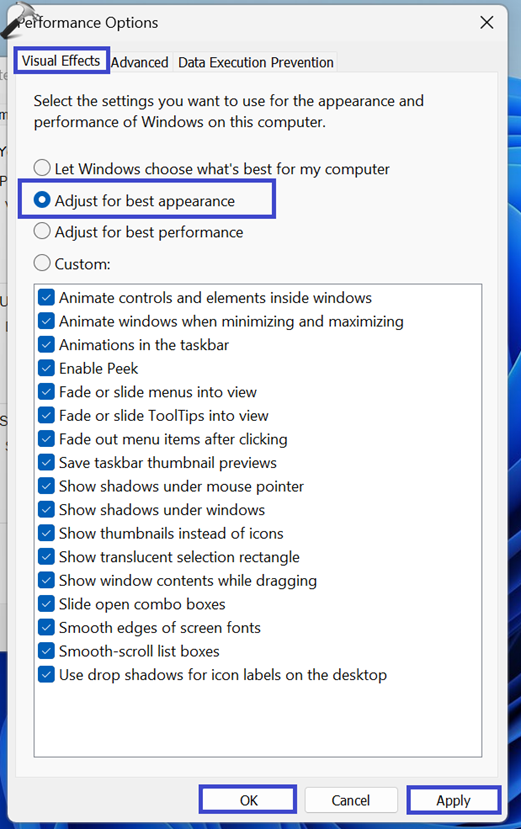
8. Click OK followed by Apply.
Step 9: Enable Storage Sence
1. Open the Settings App and navigate to “System => Storage“.
2. Toggle on the “Storage sense” option.

Step 10: Add More Memory
Add more RAM to the computer. All laptops ship with 16GB RAM but with Windows 11 32GB is more optimal for heavier workloads.
Step 11: Defragment/Trim Hard Disk
1. Search “Defragment and Optimize Drive” in the search menu. Click “Open“.

2. Select the drive that you want to defrag/trim and click on the “Optimize” option.
Step 12: Reset Security App
To fix performance issues with the CPU and GPU on Windows 11 23H2/24H1
To fix performance problems on Windows 11, use these steps:
- Open Start on Windows 11.
- Search for PowerShell, right-click the top result, and select the Run as administrator option.
- Type the following command to change the execution policy and press Enter:
Set-ExecutionPolicy Unrestricted
- Type the following command to reset the Windows Security app and press Enter:
Get-AppxPackage Microsoft.SecHealthUI -AllUsers | Reset-AppxPackage

- Restart the computer into the UEFI (BIOS) and turn on processor virtualization on your computer.
Quick tip: You can use these instructions to learn how to boot into the BIOS and enable hardware virtualization.
- Start Windows 11 again.
- Open the Windows Security app.
- Click on Device Security.
- Click the “Core isolation details” setting.
- Turn on the Memory integrity toggle switch.

- Restart the computer.
Once you complete the steps, this process should resolve the performance issues on your computer after upgrading to Windows 11 23H2 from Windows Update or clean installation. (At least, this should improve the CPU performance.)
Step 13: Teams Teams Teams
Microsoft Teams is using all available resources and needs a reset.
Close teams down and head to %appdata%\Roaming\Microsoft\Teams and delete everything.
Head to the Microsoft Store and check for Teams updates\install and apply.
Step 14: Class Not Registered
Re-register All DLL Files
An app’s Dynamic Link Library (DLL) file might not be registered on your system. In fact, Visual C++ Redistributable is a DLL file that’s required to run apps and games built with Visual Studio.
If the above options aren’t working, you can re-register all of the DLL files on your PC to resolve the error.
To re-register DLL files:
- Press the Windows key and type CMD.
- Under the Command Prompt result on the right, click Run as administrator.
- When the prompt opens, type (or copy and paste) the following command and press Enter:
for %1 in (*.dll) do regsvr32 /s %1

- You’ll see each DLL file scroll by as it is re-registered on your system display in the prompt.
- When the scrolling stops, close out of the Command Prompt and try to launch the problematic app.