More
    Home Blog

    Anet A8 Build Guide to 1st Print

    Last week, I bought the Anet A8 printer for the low low price of £114 GBP. I believe it has brought the cost of 3D printing so low that every true hobbyist now owes it to themselves to look into owning one. During the process of building and customising our A8, we took a ton of notes in the hopes that it might prove useful to others. In this article, we’re dumping our build guide, set-up guide and upgrade guide in massive write-up. For those of you who recently purchased an Anet A8, we hope this helps you get started!

    Anet A8 Build Log with Pictures

    The printer came with a digital manual that can be accessed on the SD card that comes packaged with it. I was actually pretty impressed with the quality of the manual. Much like the manuals you get from Ikea, it expressed the entire process pictorially and I generally found it pretty easy to follow. It was, however, missing a section and really needed some extra pictures at certain points. To alleviate this, I used a video released by the Anet team in tandem with the written instructions. Here is part 1 of that video:

    I took pictures of the process of building my Anet A8, which you can find by expanding the section below this paragraph. I want to note that this was my first 3D printer build and I screwed up in a few places (which I have documented). I would not use the pictures below as your sole source of information for building this printer.

    Click here to view my complete build log

    Setting up your Anet A8 for the First Print

    The instructions terminate with a completed printer, but do not provide any guidance on how to do the first time set-up so that you can do your first print. I find this pretty unforgiveable – at this point you still have a considerable amount of set-up work to do! Anet provides a pretty handy “debugging” video which covers most of these steps, which you can find here:

    I’ll also write out exactly what I did after building my printer:

    Bed Covering Material

    The printer bed of the A8 comes from the factory with a brown masking tape covering it. This isn’t just for shipping – Anet intends for you to print on top of this! In fact, painters tape is one of the better beginners bed printing materials. Hopefully you, unlike me, did not remove this tape.. Another material you can use is called Kapton tape, which is a tape which remains sticky in a wide range of temperatures. This will provide an arguably better printing surface. Luckily for me, I had some Kapton tape which we have used with our Lulzbot lying around so I put it on my Anet A8’s print bed.

    The best solution for bed covering material is to buy a small block of glass to seat on top of the bed. This is discussed later.

    Whatever bed material you use, make sure you get it sorted out and applied before you continue on to the next steps. Anytime the material is changed, you’ll need to re-level the bed at least.

    Aligning the Z-Axis Rods

    Finer alignment of the Z-Axis rods should be completed first. The Z axis motors should always move together and keep this alignment, so you basically set it now and check after every few hours of use. Misalignment here can cause the same symptoms as an unleveled bed. Furthermore, any time this is messed with, you’ll need to re-level your bed (and possibly set the z-axis limit switch).

    Setting the Z-Axis Limit Switch

    The limit switches are used to tell your printer where its “home” is. This location is then used as a relative point from which all the rest of your printing begins. Of all the limit switches, the Z-axis (vertical motor) limit switch is the most important. It is used to tell your printer where the point is where the extruder head is just slightly over the bed.

    This limit switch will need to be adjusted. To perform this adjustment:

    1. Power up your printer and access the main menu.
    2. Go to Quick Settings->Home All. The printer head should move to all the limit switches.
    3. Disable the motors by going to Quick Settings->Disable Stepper Motor.
    4. Move the printer head X-axis and printer bed Y-axis so that the head is over the bed.
    5. Measure the distance between the tip of the extruder and the bed.
    6. Subtract 2mm from that distance and lower the Z-axis limit switch down that amount.
    7. Repeat step (2) to re-center everything against the limit switches.
    8. Repeat step (3) and check the extruder head. It should now be within 2mm of the bed, but not touching it.
    9. Continue to leveling the bed.
    Leveling the Bed

    Leveling your bed is probably most important calibration you can do. The procedure configures your printer so that your extruder tip is a set distance from the bed at all points across the bed. This allows the printer to accurately print the base layer of plastic which forms the foundation for everything you print.

    Leveling the bed on the A8 should be accomplished at first set-up, every 5 or so prints after that, and anytime you move the printer or otherwise adjust it. In most cases, the process should only take about 5 minutes, so don’t worry about it too much.

    If your prints are having problems where the base layer is not adhering to the bed properly – particularly if it is just one area of the bed that is having this problem – bed leveling is very likely to be the problem.

    1. Power up your printer and access the main menu.
    2. Heat the bed and extruder to PLA settings by going to Quick Settings->Preheat PLA. Do not touch the extruder tip after completing this step! It will be extremely hot. The bed will also be hot, but touchable.
    3. Go to Quick Settings->Home All. The printer head should move to all the limit switches.
    4. Disable the motors by going to Quick Settings->Disable Stepper Motor.
    5. Move the printer head along the X-axis and bed along the Y-axis so that it is over the close-left corner of the bed relative to you.
    6. Adjust the printer bed screw until you can just fit a piece of card stock paper (measuring .2mm in width) between the bed and the extruder tip. You want the tip to be hitting the cardstock but not pressing it into the bed. You can test this by moving the head with the card under the tip. If the card moves with the head, that’s great. You don’t want it to be hard to move or for it to make scratching noises while it drags on the paper though. You should be able to insert and remove the card easily.
    7. Repeat (4) and (5) for the other 3 corners of the printer bed.
    8. Repeat the whole process again, noting any errors.
    9. If any adjustments were made in step (7), repeat the process again. Keep repeating it until you check all four corners with no errors found at all.
    10. Screw on and tighten the wing nuts which secure the bed leveling mechanism.
    11. Repeat the leveling process one more time – sometimes the wing nuts can throw it off.

    Your First Print

    With the bed leveled, you’re ready to attempt your first 3D print. Before you do that, though, you need to understand the different types of printer input files and how to generate them.

    STL

    A 3D print generally starts with an STL file. This type of file describes a 3D part as a set of triangles is generated from a CAD modeling program like Sketchup, Blender, Solidworks, etc. These are also the types of files you download from online open-source 3D printing sites like ThingiverseYeggi and others. To read more about how to find or create your own STL files, check out our article on using 3D printing for drones.

    GCode

    3D printers do not have the capability to print an STL file, however. As sophisticated as they might look, they are actually controlled by pretty dumb little computers. These computers can only follow a very basic set of commands – like “move X-axis motor left 1mm”, “extrude filament .5mm”, “turn extruder temperature to 210 degrees”, etc. These sorts of simple commands are exactly what make up “.gcode” files.

    An important thing to know about gcode files is they are compiled for the printer. A gcode file built for our Lulzbot Mini, for example, should not be used with the Anet A8 built in this article. It may work – but more likely it’s just going to make a wasteful, dangerous mess of stringy plastic.

    Slicers – Converting STL to GCode

    “Slicer” programs fill in the important middle ground of converting STL files you can download from the internet into the gcode instructions your printer needs to build a model. The Anet A8 SD card comes with two slicer programs – “Cura” and “Repetier”. We are going to recommend you use Cura in this guide since we are more familiar with it (it is the slicer of choice for our other 3D printer).

    Printing your first gcode

    For people who have never done a 3D print in their lives, I recommend you start out by printing one of the pre-compiled gcode files that is on the SD card that came with your A8. There are several options you can choose from, it doesn’t matter which one you pick. The objective is to see if your printer is properly put together and can print out something basic that has already been designed for it.

    The process of printing a gcode file is a few easy steps:

    1. Put the file on the root of your SD card.
    2. Insert the SD card into your Anet A8 printer.
    3. Access the main menu by pressing the center button and select “SD Card->Mount”.
    4. Access “Print File”.
    5. Select the gcode file you wish to print.

    The extruder head and bed will begin heating up immediately. Once they are up to temperature, the printing process will begin. Watch it carefully for the first few minutes to ensure the first layer is properly laid down onto the bed and is sticking fine. If it is – you’re free to walk away. If not, you’re in for some troubleshooting.

    Printing some STL files

    This is the real reason you likely got a 3D printer – you wanted to turn some camera mounts or other quadcopter parts from STL files into real plastic bits you can actually use. In this section, I’m going to walk you through how I printed out my first few STL files on my Anet A8.

    Cura

    As mentioned above, I will be using Cura as my “slicer” – the program that will convert STL files to gcode files the printer can use. I recommend using Cura 14.07 with the Anet A8. It is almost a year old at this point, but I was able to get it working very quickly.

    Version 14.07 of Cura should come on the SD card that comes with the printer. You can find it under “A8*\A8*\A8\Software\Cura 14.07”. You can also download versions of Cura here. We highly recommend you download Cura 14.07.

    I briefly tried to get the latest version of Cura – 2.5.0 – working, but was unable to due to some printing problems with the settings I was using. I will continue to attempt to get this to work and will update this guide if I figured it out. Honestly, though, unless you are trying to do some pretty advanced prints, Cura 14.07 should be more than enough for your needs. I have yet to find a model it could not print.

    Configuring your Printer in Cura
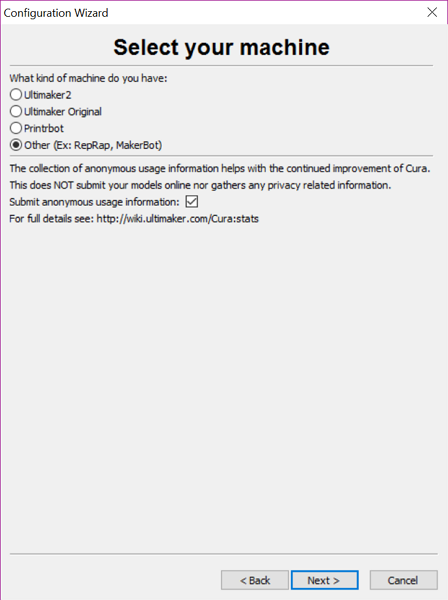
    Configuration of Cura is pretty simple. When you first launch the application, you’ll be prompted with the “Machine Creation Wizard”. Click “Next” to access the first configuration page.
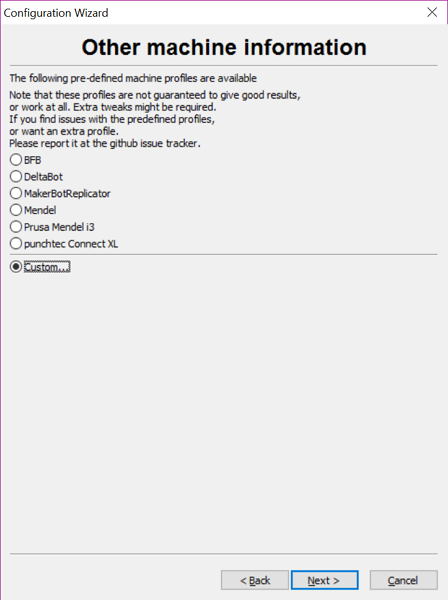
    In the next step, select “Custom”.

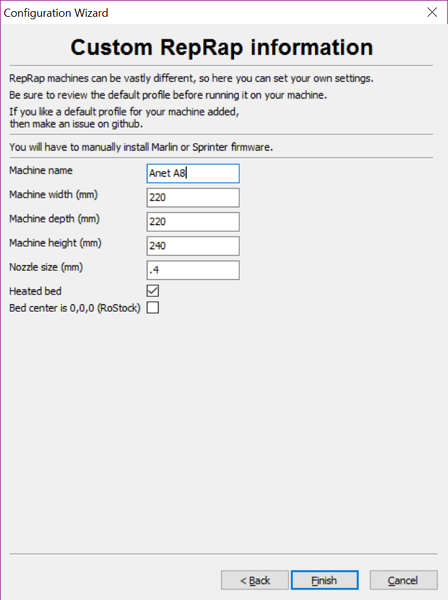
    Finally, copy the settings seen in this screenshot on the next page:

    With that completed, you’ve told Cura the hardware specs for your printer. You still need to configure it to tell it how to best print. I recommend doing this by loading a pre-programmed “profile” file from Anet. This profile can be found in the ini file on the SD card that comes with the printer (under “A8*\A8*\A8\Software\Cura 14.07”).

    Once you have the file, load it into Cura by clicking File->Open Profile.

    Generating your Gcode File

    Now that Cura is set-up, you can start generating Gcode files that your Anet A8 can use to print objects. This process isn’t too difficult but has a small learning curve to it. To start “Load” an STL 3D model file into Cura using the button in the main window. Position the 3D object inside of the printing box where you want it. You can rotate, resize and move the object using tools which you can find in the main window of Cura. Once you’re done, you can create the GCODE file by clicking the “Toolpath to SD Card” button, which saves a GCODE file to an attached SD card.
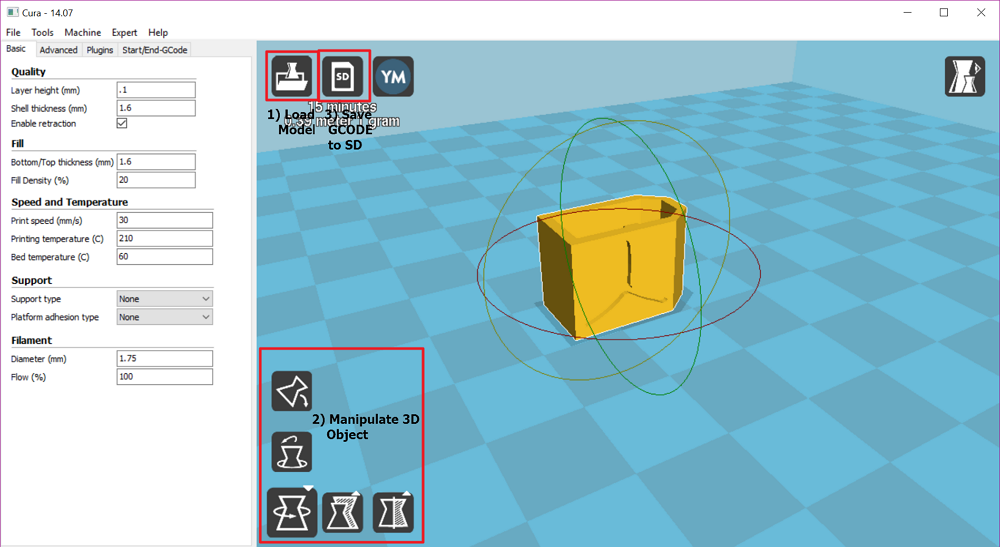
    From here, the printing process is identical to the steps above “Printing your first GCODE file”. Plug your SD card into your printer and cross your fingers!

    Anet A8 Upgrades

    Purchased Upgrades

    Mosfet Upgrade – Highly Recommended for Safety

    The extruder and hotbed FET drivers are one of the big weak points of this printer. Left to their own devices, they will slowly melt the plastic connectors on the main board where you plug in the extruder / hotbed wires. A couple of people have even reported smoking boards. For this reason, I highly recommend bypassing these FETs by using a specialized expansion board. Luckily, these are pretty cheap and readily available. I picked mine up for $16 on Amazon.

    The installation process is pretty simple and covered in this guide:
    //3dprint.wiki/reprap/electronics/heatbed_mosfet
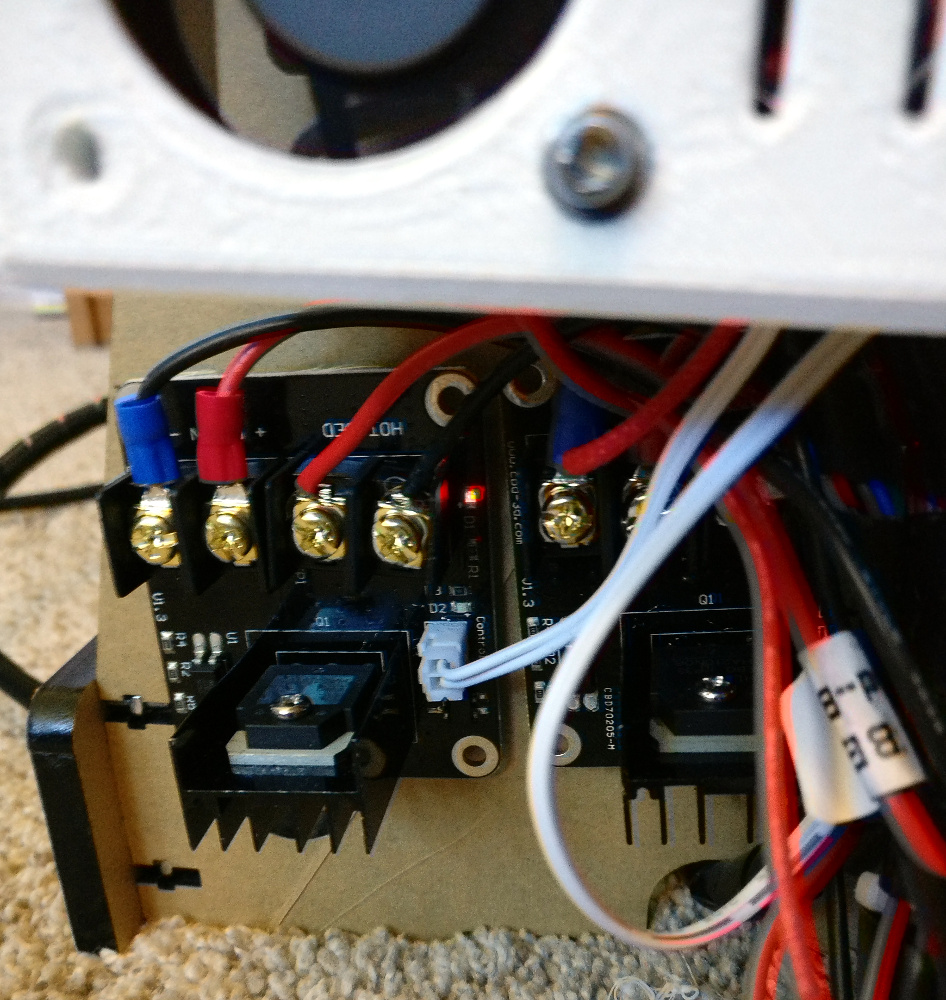
    I did the mod on both my hotbed and extruder, though most people only suggest the hotbed. This removed all load from my Anet mainboard:

    Borosilicate Glass Bed

    The stock aluminum bed must be covered with painters tape or kapton tape to print well (or at all). This is a little frustrating to work with because it needs to be replaced regularly and it is extremely difficult to get it perfectly flat. The result is 3D prints that have imperfections on the bottom and issues with the first layer of the print.

    The best workaround I’ve come across in the printing community is to use a glass sheet on your bed. You can have this sheet made by a local glass specialty store, or you can purchase one on Amazon. Living in a small community with no glass artisans, I opted for the latter. Unfortunately, Amazon only offers glass beds that are slightly smaller than the 220x220mm printing surface available on the A8. Here is the one I picked up: Signtek Heated Bed Glass Plate.
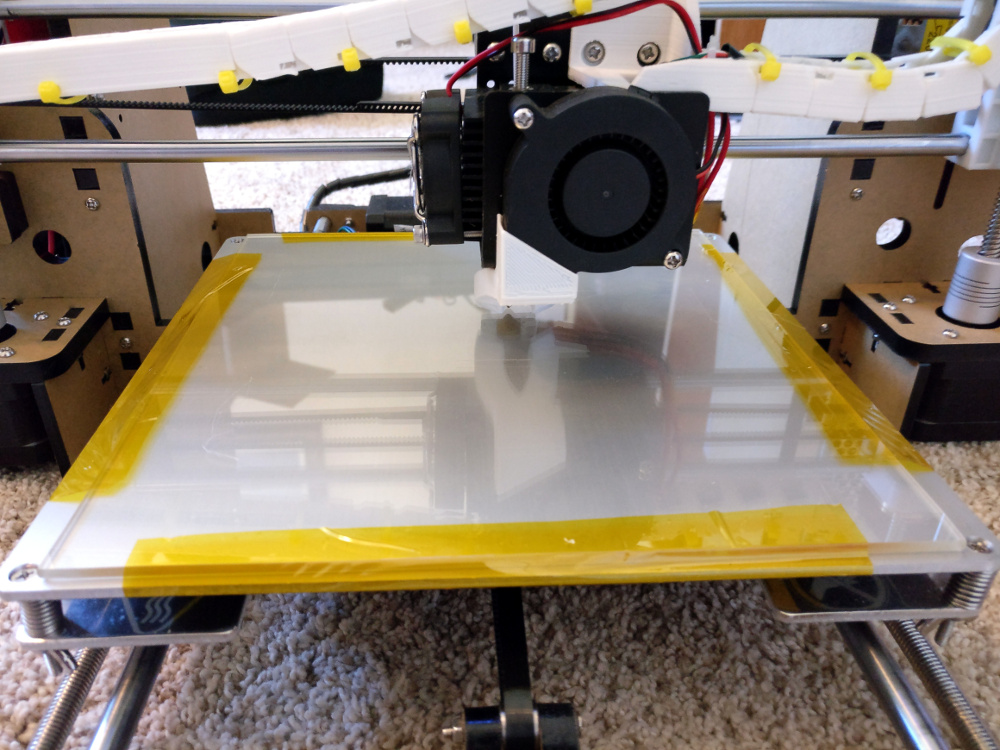
    There are many ways to install a glass plate on the bed. I opted to just use Kapton tape to do it. Installation is relatively simple:

    1. Remove the heated bed.
    2. Place glass sheet in center of the bed plate.
    3. Use Kaptop tape to secure it.
    4. Screw heated bed back on.
    5. Re-level bed – always necessary!

    Printed Upgrades

    This might be the coolest thing about the Anet A8 for me – when you first build it, you have a low-end 3D printer, but you can actually upgrade it to a pretty decent machine by simply using it to print out upgrades for itself. I find the notion of the machine improving itself pretty pleasing. Maybe I’m just a little weird though. Anyhow, here are some of the upgrades I printed for my Anet A8 that I can recommend to anyone:

    High-Efficiency Extruder Cooling Fan Duct
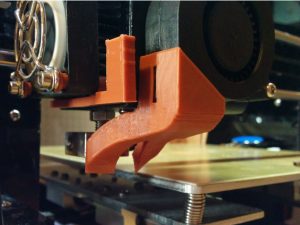
    Upgrading the fan duct had an immediate improvement on the quality of my 3D prints. Had I known what I do now, it would have been one of my first prints. Unfortunately, it is a pretty challenging object to print (it requires supports, among other things). So – if you’re new to 3D printing, don’t try this as your first print! But try it soon.

    //www.thingiverse.com/thing:2133328
    Spool Holder and Top Mount

    Getting my filament spool attached to my Anet A8 was a top priority. I didn’t like having to place it on top of a workbench or cabinet. While I was at it, I printed a proper spool adapter / holder, which was a massive print which took almost 16 hours! I recommend both – they really improved the ergonomics of the printer.
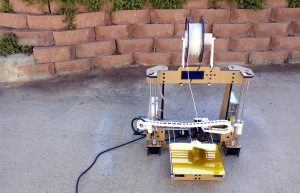
    Spool mount for A8: //www.thingiverse.com/thing:2162266
    Spool holder for A8: //www.thingiverse.com/thing:1624641

    Extruder Harness Chain

    This is a feature that came with the higher-end Lulzbot mini we own that I wanted on my A8. It confines the movement of the wiring harness for the extruder to simple push-pull motions and protects the wiring. It looks really snazzy once completed.
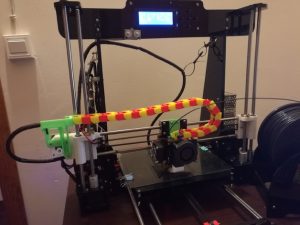
    Extruder harness chain for A8: //www.thingiverse.com/thing:1872473

    More..

    These are just my favorite parts I gathered off of Thingiverse. There are hundreds of parts on that site though. Simply search “Anet A8” to see them.

    What Is the “God Mode” Folder in Windows 10, and How Do I Enable It?

    What if Windows let you quickly access administrative tools, backup and restore options and other important management settings from a single window? If that sounds good, look no further than the so-called “God Mode.”

    What Is God Mode?

    No, God Mode doesn’t unlock any extra secret features in Windows or let you do any tweaking that you can’t do in the regular Windows interface. Instead, it’s simply a special folder you can enable that exposes most of Windows’ admin, management, settings, and Control Panel tools in a single, easy-to-scroll-through interface.

    And yes, you can also find a lot of this stuff by searching the Start menu, but to do that, you kind of need to know what you’re looking for begin with. The God Mode folder offers an easier way to browse through 206 of these tools and get to know them.

    By the way, “God Mode” is just a popular name some people give this special folder. You can name the folder anything you like—including How-To Geek Mode, for example.

    Here are the categories of tools you’ll find in God Mode:

    • Administrative Tools
    • AutoPlay
    • Backup and Restore
    • Color Management
    • Credential Manager
    • Date and Time
    • Devices and Printers
    • Ease of Access Center
    • File Explorer Options
    • File History
    • Fonts
    • Indexing Options
    • Infrared
    • Internet Options
    • Keyboard
    • Mouse
    • Network and Sharing Center
    • Pen and Touch
    • Phone and Modem
    • Power Options
    • Programs and Features
    • Region
    • RemoteApp and Desktop Connections
    • Security and Maintenance
    • Sound
    • Speech Recognition
    • Storage Spaces
    • Sync Center
    • System
    • Tablet PC Settings
    • Taskbar and Navigation
    • Troubleshooting
    • User Accounts
    • Windows Defender Firewall
    • Windows Mobility Center
    • Work Folders

    Each of these categories contains any number of tools and might even be divided into further subcategories, meaning that you’re likely to find nearly anything you’re looking for.

    Enabling God Mode in Windows 10

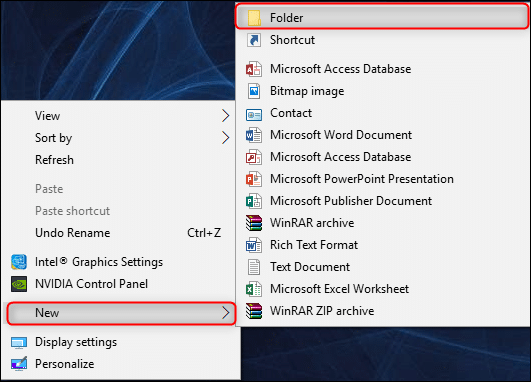
    To make this work, you must be using an account with administrative privileges. Go to your desktop and create a new folder by right-clicking any open area, pointing to “New” on the context menu, and then clicking the “Folder” command.

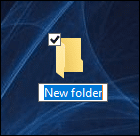
    The new folder icon will appear.

    Now, rename the folder to the following:

    GodMode.{ED7BA470-8E54-465E-825C-99712043E01C}

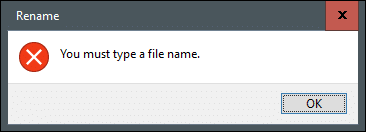
    To use a name other than GodMode, just replace “GodMode” in the above text with whatever you want to name the folder. The characters that follow (including the period) must remain exactly as listed above. If you remove “GodMode” without adding any text in its place, you’ll receive the following error.

    Once you’ve properly renamed the folder, you’ll notice the folder icon change to a control panel icon.

    Double-click the icon to open the newly-created God Mode. The major categories are organized alphabetically and so are the more than 200 settings you’ll find within those categories.

    While it’s certainly handy for getting to know the official names of all the Windows tools, you’ll probably find (like we did) that it’s faster to search for them through the Start menu. Still, the God Mode folder offers a handy introduction to all the tools available and a great way to search for things when you’re not quite sure what they’re named.

    How to Hide Taskbar on Second Monitor in Windows 11

    When you have a dual monitor set up on your PC or just connected your laptop to a second monitor, you might not want to see the taskbar everywhere. There will be one main display where you want the taskbar. In such cases, you can hide the taskbar from your second monitor, if you are on Windows 11.

    Let’s see how you can hide the taskbar from the secondary display in Windows 11.

    Hide Taskbar from Second Monitor in Windows 11

    When you want a full-screen experience on your second monitor, there is no need to show the taskbar there. Since you can see the taskbar from the main monitor and control apps from there, we will see how we can hide the taskbar from the second monitor in Windows 11.

    By default, the taskbar will be visible on both your monitors as shown below.

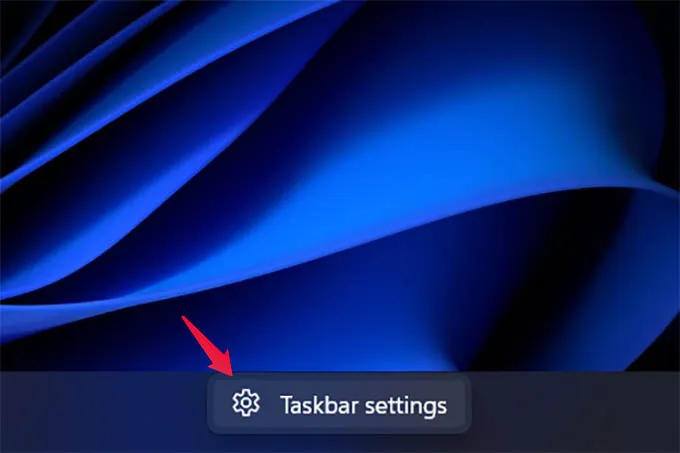
    From the Windows 11 Settings window, click to expand the option “Taskbar behaviors” at the bottom.

    Once the settings are shown, uncheck the option “Show my taskbar on all displays.” The setting will be set to enabled by default. You can uncheck this to hide the taskbar from the second monitor in Windows 11.

    Once you uncheck the above option, you will see the taskbar only in your primary monitor. See the picture below.

    However, this will depend on which monitor you set as your secondary display. If you set your second monitor as your primary monitor, the taskbar will only be shown in the same.

    Start11 Release Candidate 2 out for Windows 11 with fixes and full screen Start menu option

    0

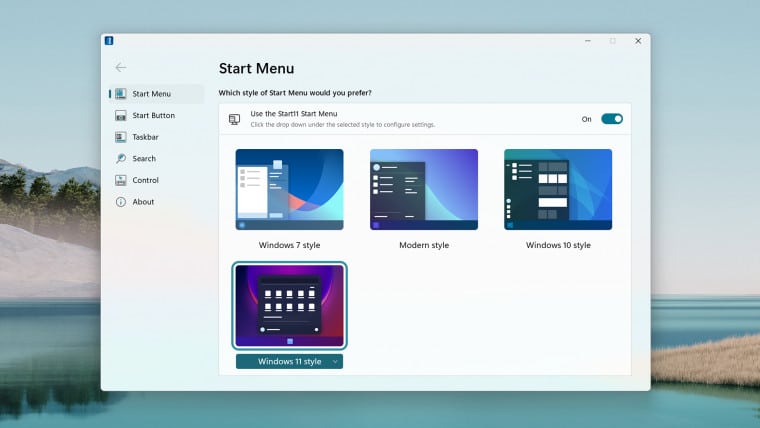
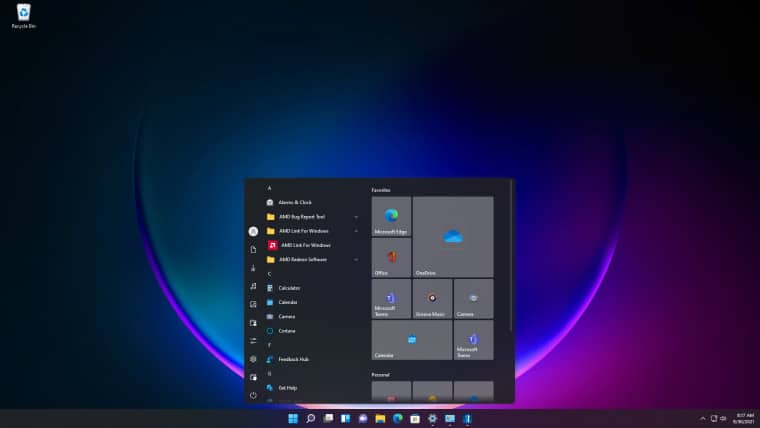
    Exactly a week after releasing Start11 Release Candidate 1, Stardock has today announced the availability of the Release Candidate 2 update for Start11, a program that allows users to customize the Windows Start menu and taskbar. This update enables the ability to hide the recently installed applications list for both Windows 10 and 11 menu styles, an optional full-screen menu for Windows 10 and 11 styles, the ability to hide “recent document list” in the Windows 11 menu style and more.

    As with previous editions of StartX products, Start11 allows users to restore the Start menu to appear as it does in previous versions of Windows, as well as customize and enhance its functionality. Release Candidate 2 has also added an option to change individual tile colors for the Windows 10 menu style and enables wider tile groups too.

    Start11 is designed for Windows 11 and Windows 10 and comes loaded with features intended to make Windows more productive and personal. Start11 supports moving the Start button to the middle or to the left, adjusting the taskbar size, re-ordering quick access shortcut lists, options for adjusting grid spacing, enhanced classic and modern search experiences and much more.

    As a reminder of what you get with Start11, here are a few of its highlights:

    • Returning the Start menu to the appearance of previous versions of Windows
    • Enhancing Windows 10 and Windows 11 menus with new functionality
    • Repositioning the taskbar to the top of the desktop for Windows 11
    • Windows 10 style taskbar context menu for Windows 11
    • Improving the classic and modern search experiences

    With Release Candidate 2, the full-screen menu feature makes it easier to use Windows 10 or 11 on a tablet. When paired with the new option to adjust icon sizes for Windows 10 and 11 style menus, Start11 significantly improves the tablet experience.

    For users who want to personalize their Start menu, Start11 offers robust customization options ranging from aesthetic to functional. Start11 supports a host of new Start menu ideas such as the concept of pages, minimalism, and features for enterprise customers.

    New Features in Release Candidate 2

    • Option to hide “recently installed” applications list for Windows 10/11 menu style
    • Full-screen menu option for Windows 10/11 menu styles – great for tablets!
    • Hide “recent document list” in Windows 11 menu style
    • Enhanced support for wider tile groups in Windows 10 style menu
    • Enabled ability to change the background color of individual Windows 10 menu items
    • Options to adjust icon sizing for Windows 10/11 style menus
    • Animations now support 240hz

    Here is the full changelog:

    • Tweaked quick access link popup menus to resolve an issue where they may not close on loss of focus correctly
    • Tweaked quick access link popup menus to not cause a menu close when closing one and opening another via clicking directly
    • Fixed paint issue on Win11 menu quick access links area when switching between monitors
    • Fixed appearance typo in config
    • Fixed crash introduced by some RC1 work with quick access link menus
    • Added support for quick access menus in Win10/11 style. They do not auto-expand on mouseover but require a click to open
    • Holding down shift when clicking on a quick access link that’s a menu will open it as a window where possible
    • Added missing W filter option in all apps for Win10/11 style
    • Fixed issue with quick access menus not always closing on loss of focus
    • Fixed issue with Win10/11 apps list loading up icon for application exe vs shortcuts
    • Fixed issue with Win10/11 apps list not loading up multiple shortcuts to apps in some circumstances
    • Fixed issue with Win10/11 pinned items lists loading up app exe icon vs shortcut exe
    • Fixed issue with Win10/11 pinned apps not launching correct shortcut but exe instead
    • Added option to hide recent documents on Win11 menu
    • Added option to change icon size on Win10 and Win11 menus
    • Added option to change tile color on Win10 style menu
    • Pressing escape when in all programs list in Win11 style menu simply goes back to the previous page now rather than closing
    • Fixed drag & drop offset issue in Win7/Modern menu styles
    • Limited Win10/11 menu size based on current screen resolution
    • Fullscreen mode for Win10/11 menus
    • Fixed Win11 menu rearranging issue where items would sometimes rearrange inconsistently especially after a lot of rearranging
    • Dragging on the Win11 menu no longer highlights the page title area
    • Fixed Win7/Modern Quick access links showing as menus will now open correctly when clicked
    • Prevented Win7/Modern quick access link menus popping up under the menu
    • Win7/Modern quick access link menus now dark mode aware
    • Fixed universal apps quick access menu potential crash issue
    • Win7/Modern quick access menus now have rounded corners when rounded menu mode is enabled
    • Fixed pinning from Pin to Start11 from explorer menus pinning items to first index in list for Win11 style menu
    • Fixed pinning issue for Win10 menu replacing last entry in pinned list when pinned from explorer windows or search page
    • Added missing run as admin option on store apps which support it on Windows 10/11 menu (Terminal etc)
    • Internal frame rate for animations moved to 240hz
    • Fixed issue with mouse getting attached to the top of the menu when opening the menu with Start11 search disabled
    • Fixed issue with clock and tray area missing when using custom start button on Windows 11 Dev channel builds
    • Fixed issue with custom start button left visible after disabling custom start button or making button centered on Windows 11 (believed to be Dev channel only again)
    • Fixed issue on Win11 menu where creating a new page when on a lower page number caused the page to be inserted as a group on the next page instead
    • Fixed issue on Win11 menu where deleting pages could cause a blank page to appear
    • Tweaks to button handling on Win11 when not using custom start button
    • Config UI now responds to touch input
    • Rearranging quick access shortcuts list in Win10/11 styles now saves the changes correctly
    • Fixed scrolling on menus using MS precision touchpad
    • Now able to scroll menus using touch and drag items – to drag an item either drag sideways initially or hold down until you get the right-click indicator box and then drag the item if the list has a scrollbar, otherwise drag as usual.
    • Fixed possible crash issue when moving things on the Win10/11 grids
    • Adds support for wider groups in Win10 style
    • Fixed Win11 style to show user name as friendly name vs account name
    • Fixed issue with Win11 style losing shutdown button if you set Win7/Modern style to have a very high number of icons on display or lots of grid columns
    • Fixed quick access shortcuts showing display as menu sometimes incorrectly for Win10/11 style
    • Stopped jumplists showing for MS store and settings as blank
    • Fixed issue with being able to get multiple menu options on config appear in mouseover state
    • Added option to hide recently installed applications section in Win10/11 all apps list
    • Fixed changing icon size on Win7/modern menu requires two opens of the menu to see the change fully
    • Fixed desktop search carried out last so didn’t always appear in results as quickly as wanted
    • Fixed search getting stuck in some searches
    • Fixed issue with taskbar at the top of the screen losing the mouse over thumbnails on one monitor if multiple monitors on Windows 11
    • Fixed clicking very left of the leftmost start button can open Win11 menu on Windows 11
    • Fixed explorer hang issue if replacing start button on computer with multiple monitors (3 ideally)
    • Fixed start menu open offset issue on multiple monitor setups with centered start button
    • Fixed Cortana search mode causing Start menu to close when renaming a group/anything else
    • All apps list for Win10/11 modes now also includes url files and help documents etc
    • Removed surplus MS edge link in all apps
    • Double-clicking on the style image opens the settings drop down in the config now

    Start11 is currently available for $4.99. There is an upgrade option for users of Start8 and Start10. For more information, visit www.stardock.com.

    Object Desktop includes programs such as FencesStart10GroupySoundPackagerDeskScapes, and Multiplicity.

    Windows 11 performance patch for AMD Ryzen CPUs reportedly rolling out next week

    0

    Recently it came to light that AMD’s Zen-based chips had performance issues on Windows 11. AMD had identified a couple of problems, the first related to the Level 3 (L3) cache latency that would impact games and other latency-sensitive applications. While the other problem was related to Collaborative Processor Performance Control (CPPC) whereby the fastest CPU core was not scheduled properly when needed. You can read about it in more detail here.

    The issue in fact was detected on officially supported AMD processors, ie, Zen+ and newer, which meant the performance hiccup wasn’t due to something like Virtualization-based Security (VBS) that is known to heavily impact 1st gen Zen processors.

    Thankfully, both AMD and Microsoft stated that patches for the two issues were heading out within this month and today, Wccftech claims it has received information regarding the purported release dates. According to the site, both the issues have been resolved and the patches will begin rolling out in a week’s time.

    • The CPPC issue has been resolved. The AMD driver power profile is in the release process and targeted for GA release on 10/21. If it is needed before GA, AMD can share the driver directly with customers upon request.
    • The L3 cache latency issue has been resolved by Microsoft. Microsoft plans to release the fix in their 10C Windows Update which is targeted for 10/19.

    Essentially, Wccftech says that an update for Windows 11 that lands next week would add the fix for the L3 cache latency problem, while the UEFI CPPC2 patch will be generally available a couple of days after that.

    Microsoft shares Windows 11 TPM check bypass for unsupported PCs

    Microsoft has published a new support webpage where they provide an official method to bypass the TPM 2.0 and CPU checks (TPM 1.2 is still required) and have Windows 11 installed on unsupported systems.

    This is somewhat surprising considering the tech giant’s unwavering stance concerning the minimum requirements for the new Windows version.

    However, it looks like Microsoft couldn’t ignore the fact that bypassing TPM checks is fairly simple, so to avoid having people breaking their systems by using non-standardized third-party scripts, they decided to just give users an official way to do it.

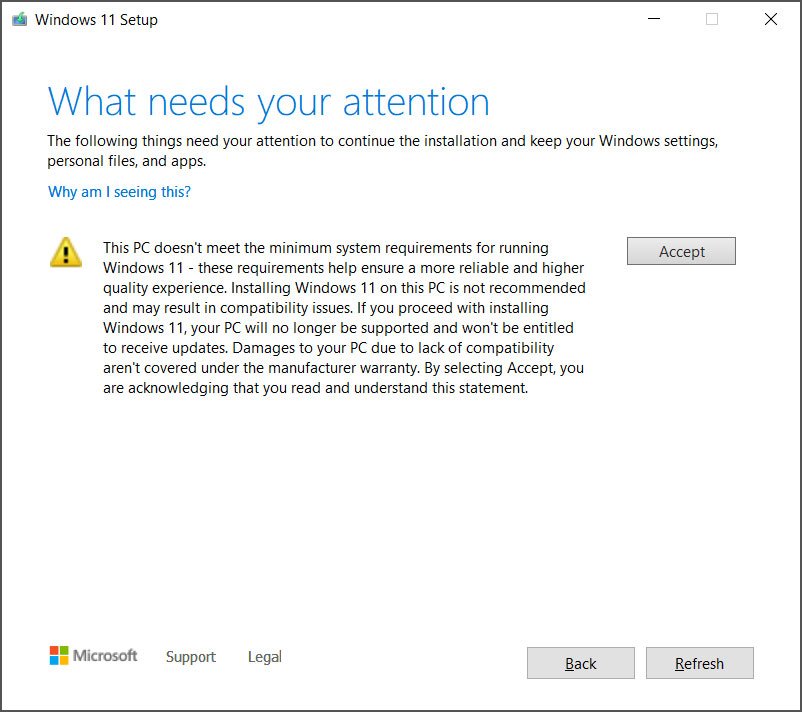
    Installing Windows 11 on unsupported hardware comes with some pitfalls that users must be aware of, and in some cases, agree to before the operating system will install.

    Waiver for installing Windows 11 on unsupported hardware

    “Your device might malfunction due to these compatibility or other issues. Devices that do not meet these system requirement will no longer be guaranteed to receive updates, including but not limited to security updates,” Microsoft explains in a new support bulletin.

    If you are willing to accept these risks, then you can use the following method to install Windows 11 on a device without a TPM 2.0 processor or a compatible CPU.

    How to install Windows 11 on unsupported devices

    Microsoft’s official bypass is to add a Registry value named “AllowUpgradesWithUnsupportedTPMOrCPU” and then install Windows 11 using bootable media.

    The whole registry entry required can be seen below.


    Windows Registry Editor Version 5.00

    [HKEY_LOCAL_MACHINE\SYSTEM\Setup\MoSetup]
    "AllowUpgradesWithUnsupportedTPMOrCPU"=dword:00000001

    The Windows 11 setup program will no longer check for a TPM 2.0 security processor or compatible CPUs when added.

    However, you will still require a TPM 1.2 security processor, which many will not likely have. If you are missing a TPM 1.2 processor, you can bypass all TPM checks by using this script that deletes appraiser.dll during setup.

    To use the new AllowUpgradesWithUnsupportedTPMOrCPU bypass to install Windows 11 on devices, Microsoft instructs you to perform the following steps:

    1. Please read all of these instructions before continuing.
    2. Visit the Windows 11 software download page, select “Create tool now”, and follow the installation instructions to create a bootable media or download an ISO.
    3. On Windows, click ‘Start’, type ‘Registry Editor’ and click on the icon to launch the tool.
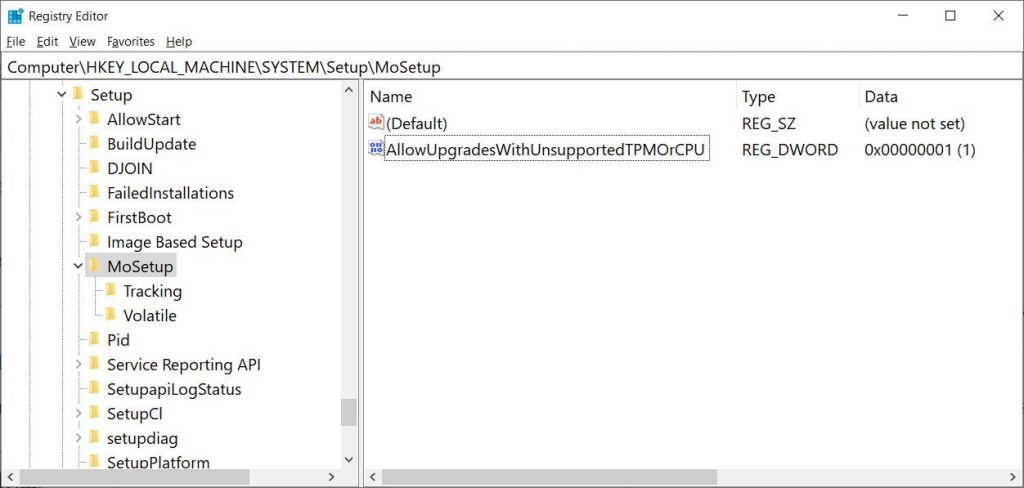
    4. Navigate to the HKEY_LOCAL_MACHINE\SYSTEM\Setup\MoSetup Registry key and create a new “REG_DWORD” value named “AllowUpgradesWithUnsupportedTPMOrCPU” and set it to “1”.
    5. Reboot your system

      Alternatively, you can download a premade Registry file that you can double-click on and merge it to create the above value for you.

      When done, it should look like this in the Registry Editor.
    Adding the new registry AllowUpgradesWithUnsupportedTPMOrCPU value

    Having done all that, you may now upgrade to Windows 11 by double-clicking on the downloaded ISO file and running Setup.exe or by using the bootable Windows 11 media you created in Step 1.

    Microsoft states that standard installation options such as ‘Full Upgrade’, ‘Keep Data Only’, and ‘Clean Install’, will all be available as usual.

    Not a dependable solution

    At this point, we should warn you that even if the above appears to be fairly simple and straightforward, there are risks involved when adding registry keys or modifying existing entries.

    Doing something wrong in the Registry Editor could result in a corrupted filesystem or unbootable OS, leaving you with the only option to reinstall it. As such, if you want to experiment with Microsoft’s guidelines, you are doing so at your own risk.

    Also, TPM 2.0 remains an important security feature that powers some of Windows 11’s security features, so if you’re installing Windows 11 on a non-TPM 2.0 chip, you will miss out on all of them.

    Understanding and accepting these risks is important, as is the fact that Microsoft is not recommending to install Windows 11 on an unsupported system unless you are instructed otherwise by support.

    Some of the underlying incompatibilities may introduce minor or major functional problems in the future, so we would recommend this path only to those who have a good reason to take it. Plain curiosity and fear of missing out aren’t.

    For the rest, just wait until you can upgrade your hardware or buy a new and supported system. The Windows 10 EOL (end of life) date is in October 2025, so there’s plenty of time.

    How to Get Google Assistant for PC

    0

    What to Know

    • Install the Unofficial Google Assistant for Windows, then set it up as a project in the Google Actions Console.
    • Then, use the keyboard shortcut Windows key+Shift+A to open Google Assistant while the program is running.
    • On a Chromebook, go to Settings Search and Assistant Google Assistant.

    There is no official Google Assistant app for Windows, but there is a workaround to access Google Assistant on a Windows 10 computer. You can also enable Google Assistant on Chromebooks.

    How to Get Google Assistant on Windows

    To get started using Google Assistant on Windows, install the Google Assistant Unofficial desktop client and then set it up:

    1. Go to the Google Actions Console and select New Project. Agree to the terms and services.New Project in the Google Actions Console
    2. Enter any name for the project (such as WindowsAssistant), then select Create project. Create project in Google Actions Console
    3. Scroll to the bottom of the next page and select Click here next to Are you looking for device registration.Click here next to Are you looking for device registration in the Google Actions Console
    4. Select Register Model.Register Model in the Google Actions Console
    5. Enter any names you want in the Product name and Manufacturer name fields, choose any device under Device type, then select Register Model.Register Model in Google Actions Console
    6. Select Download OAuth 2.0 credentials to download the JSON file you need to set up the assistant.Download OAuth 2.0 credentials in the Google Actions Console
    7. Go to the Google Cloud Platform and click Select a Project at the top of the page. If your project name appears next to Google Cloud Platform, skip to step 11.Select a Project drop-down arrow in the Google Cloud Console
    8. Select the All tab, choose your project, then select Open.Open under Select a project in the Google Cloud Platform
    9. Select APIs and Services in the left menu (if you don’t see it, select the menu icon in the upper-left corner).Menu icon and APIs and Services in Google Cloud Platform
    10. Select Enable APIs and Services.Enable APIs and Services on Google Cloud Platform
    11. Enter Google Assistant in the search bar, then select Google Assistant API.Google Assistant in the search bar and Google Assistant API in Google Cloud Platform
    12. Select Enable.Enable Google Assistant API in Google Cloud Platform
    13. On the next page, select Credentials in the left sidebar, then select Configure Consent Screen.Credentials and Configure Consent Screen on Google Cloud Platform
    14. Select External for the User Type, then select Create.External and Create under User Type on Google Cloud Platform
    15. Select User support email and choose your email address.User support email on Google Cloud Platform
    16. Scroll to the bottom of the page, enter your email address under Developer Contact Information, then select Save and Continue. Save and Continue under Developer Contact Information on Google Cloud Platform
    17. Skip the next two pages (Scopes and Optional Information) by scrolling to the bottom of the page and selecting Save and Continue.Save and Continue on Google Cloud Platform Scopes page
    18. Select Back to Dashboard.Back to Dashboard on Google Cloud Platform
    19. Scroll down to the Test users section and select Add User.Add Users under Test users on Google Cloud Platform
    20. Enter your email address and select Save.Save under Add users on Google Cloud Platform
    21. Go to the Google Assistant Unofficial desktop client download page and select the Google_Assistant-Setup-1.0.0-rc.2.exe file to download it.Google_Assistant-Setup-1.0.0-rc.2.exe file on the Unofficial Google Assistant download page
    22. Open the Google_Assistant-Setup-1.0.0-rc.2.exe file you downloaded and follow the installation instructions.Choose Anyone who uses this computer (all users) to enable the assistant for anyone who uses the computer, or Only for me (user) to enable it for your personal Windows account.Anyone who uses this computer (all users) in the Google Assistant installation window
    23. If the assistant doesn’t appear right away, press Windows key+Shift+to bring it up, then select Get Started.Use the keyboard shortcut Windows key+Shift+A to open the Google Assistant Unofficial desktop client anytime the program is running.Get Started in the Windows Google Assistant
    24. Select Proceed.Proceed in the Windows Google Assistant
    25. Select the Settings gear.Settings Gear in the Windows Google Assistant
    26. Next to Key File Path, select Browse and choose the JSON file you downloaded in step 6.Browse next to Key File Path in the Windows Google Assistant
    27. Select Save, then select Automatically set a path.Automatically set a path in the Windows Google Assistant
    28. Select Relaunch Assistant.Relaunch Assistant in the Windows Google Assistant
    29. A new browser tab opens for you to get the required security token. Choose your Google account, then select Continue.Continue in Google app verifciation
    30. Select Allow.Allow on Google app verification
    31. Select Allow again.Allow on Google app verification
    32. Select the Copy icon to copy the token link.Copy icon next to the token URL on Google app verification
    33. Paste the link in the Google Assistant app and select Submit.Submit in the Windows Google Assistant
    34. Select Relaunch Assistant again.Relaunch Assistant in the Windows Google Assistant
    35. The unofficial Google Assistant app is ready to use. Type a question, or select the microphone icon to give a voice command.Microphone icon in the Windows Google Assistant

    How to Get Google Assistant for Chromebook

    If you have a Chromebook or Chrome OS device, you can enable Google Assistant.

    1. Go to Settings.Viewing apps on Chromebook.
    2. Scroll down to Search and Assistant and select Google Assistant.Setting in Chromebook.
    3. Make sure the slider is set to On.Google Assistant Settings in Chromebook.
    4. Enable the OK Google setting to allow the system to listen for and respond to that voice command. (Adjust any other options, as desired.)Enabling Ok Google in Chromebook.

    Your Best Bets

    If your goal is easy access to Google Assistant, the simplest approach is to purchase a Google Home device and set it up next to your computer. You can also install the Google Assistant app (for Android or iOS) on a phone or tablet. For a more do-it-yourself experience, buy and build the Google Voice Kit.

    Netflix Starts Testing Timer Feature to Stop Streaming Content After a Certain Period

    0

    Netflix has started testing a new feature that will allow viewers to set a timer for their favourite show or movie. The latest addition, currently live for select Netflix subscribers on Android devices globally, is another move by the US streaming platform to enhance its viewing experience. Netflix is testing the timer feature for adult profiles, though it could be expanded to its Kids viewers over time — depending on the feedback it receives during the initial testing period.

    A Netflix spokesperson told Gadgets 360 that the timer feature would be rolled out broadly after the initial testing, if the company found it improved the member experience.

    “We’re always looking for new ways to improve the Netflix mobile experience,” the spokesperson said in a prepared statement emailed to Gadgets 360. “This test is the latest example – a new timer that gives members more control over their viewing experience by simply choosing their favourite show or movie and setting a timer without having to worry about pausing it before it’s over.”

    The arrival of the timer feature on the Netflix app for Android devices was first reported by The Verge. It is currently limited to adult profiles and is aimed to help save battery life on Android devices when Netflix subscribers fall asleep while watching a show or movie on the app.

    There is no clarity whether Netflix will expand the timer feature beyond Android devices. However, The Verge mentioned in its report that the company would explore bringing it to other devices, including TV sets and desktops — subject to the adaptation of the initial testing.

    How to set timer on Netflix

    Once the feature reaches your Android device, you’ll see a Timer icon next to the casting button at the top-right corner of the screen. You’ll need to tap that icon and select from 153045, and Finish Watching.

    Netflix already has over 200 million subscribers globally. However, the platform is facing heat from the likes of Amazon Prime Video and Disney+ (Disney+ Hotstar in India).

    In the recent past, Netflix has worked hard to attract smartphone users, alongside the people who watch its content on their TVs and through its Web presence. The company recently developed better audio using xHE-AAC codec and audio-only mode as a few of its key offerings specifically for Android users. It also reportedly started testing spatial audio support for AirPods Pro and AirPods Max to uplift the experience.

    Last year, Netflix also upgraded its mobile and basic plans to HD video quality as well as started testing its Rs. 349 Mobile+ plan with HD video and desktop access to persuade new viewers.

    On his way out, Trump emits exec order suggesting US cloud giants must verify ID of all foreign customers

    0

    On Tuesday, during his last full day as US President, Donald Trump issued an executive order seeking to curtail cyber attacks by directing the government to come up with rules requiring cloud service providers to better identify foreign customers.

    It now falls to the incoming Biden administration to implement the order, which may end up simply being ignored, given the recent flood of executive orders.

    The “executive order on Taking Additional Steps to Address the National Emergency with Respect to Significant Malicious Cyber-Enabled Activities” calls for the US Secretary of Commerce to propose rules to “require United States IaaS providers to verify the identity of a foreign person that obtains an Account.”

    In a letter to Congressional leaders, Trump explains that foreign actors use US cloud service providers to carry out malicious cyber activities and that America must be able to obtain more extensive information from service providers about foreign individuals using their computing infrastructure.

    “Foreign actors use United States IaaS products for a variety of tasks in carrying out malicious cyber-enabled activities, which makes it extremely difficult for United States officials to track and obtain information through legal process before these foreign actors transition to replacement infrastructure and destroy evidence of their prior activities; foreign resellers of United States IaaS products make it easier for foreign actors to access these products and evade detection,” Trump’s letter says.

    In addition to soliciting rules for customer identification and record keeping, the order calls for setting up ways to limit certain foreign actors’ access to US cloud services and to promote greater cyber threat data sharing among service providers.

    The order gives the Secretary of Commerce 180 days to propose such rules and offer them for comment. It also calls for a report from the Attorney General and the Secretary of Homeland Security about how to encourage cloud providers to share threat information more readily.

    We can imagine the cloud giants’ view on the logistics of having to verify the identity of every non-American customer who clicks the sign-up button to spin up an off-prem virtual machine.

    Looking long term

    Trump’s order was not published in the Federal Register, but that doesn’t mean it’s automatically invalid.

    T. Greg Doucette, an attorney based in Durham, North Carolina, told The Register that normally, failure to publish an executive order would create due process problems if the government attempted to enforce the order without adequate public notice.

    But in this instance, the order wasn’t published because it simply calls for rule making from federal officials.

    “It’s not published because it falls within the exception, only directing the assorted Secretaries to prepare regulations for notice and comment,” said Doucette. “Those proposed regulations will matter, and after the required notice and comment period under the Administrative Procedure Act, final regulations would have the force of law and be published in the Federal Register.

    “But this is just typical Trump bluster that doesn’t really do anything. All of this presupposes Biden’s Secretaries follow through, as opposed to just ignoring it.”

    A former cyber official from the Obama administration who spoke to The Register agreed that it will be up to the Biden administration to decide whether anything comes of this executive order. Incoming cyber officials may decide there are some good ideas in terms of the “know-your-customer” obligations, our source said.

    However, the devil is in the details, our source opined. Any rules will need to balance benefits with compliance costs that might make US cloud providers less competitive or add to the existing skepticism that foreign entities have about the privacy of their data at US companies.

    When we asked Amazon, Google, and Microsoft to offer their thoughts on the executive order. None of the companies responded. 

    Uppbeat: Leeds-based startup Music Vine launches free music platform for content creators with no YouTube copyright or demonetisation issues

    Music Vine, a Leeds-based startup, has launched Uppbeat, a new music service for YouTubers and other content creators. With this platform, the company aims to become the go-to resource for creators across the world.

    Why Uppbeat was launched?

    Uppbeat has launched to meet various demands like avoiding copyright claims, and loss of ad revenue from YouTubers and other content creators. As per the company’s claims, the music platform removes the barrier to high-quality music and guarantees no YouTube copyright issues or demonetisation of content.

    With years of experience and a carefully curated catalog of talented artists, composers, and producers from all around the world already at its disposal, the team of eight is now poised to shake up the YouTube and content creator space.

    1000 registered tracks

    At present, the platform has over 1,000 registered tracks from indie artists, producers, and composers from around the world.

    Lewis Foster, CEO, Uppbeat said: “The lack of affordable copyright-free music has been an obstacle in the content creator space for far too long. With Uppbeat we see a real opportunity to become the go-to resource for YouTubers and creators that are seeking quality music for their content.”

    “Beyond providing a great experience for our users, supporting our artists and music producers is immensely important to us. They’re the beating heart of our platform, so we’ve devised an ethical business model that allows us to remunerate them from several revenue streams. It means our artists are always paid fairly for their music.”

    Free and premium account

    Uppbeat’s free users can download ten full-length tracks per month, which they can freely use in YouTube videos without risking copyright claims.

    Otherwise, they can opt for a £6.99 Premium account that provides unlimited and unrestricted access to Uppbeat’s catalog, as well as the ability to whitelist YouTube channels and preempt any future copyright claims.

    AirPods Max get the full iFixit teardown

    0

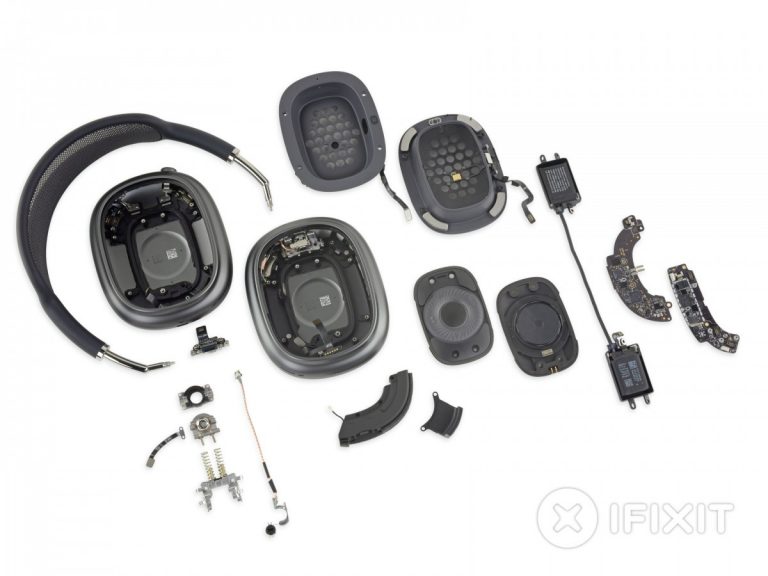
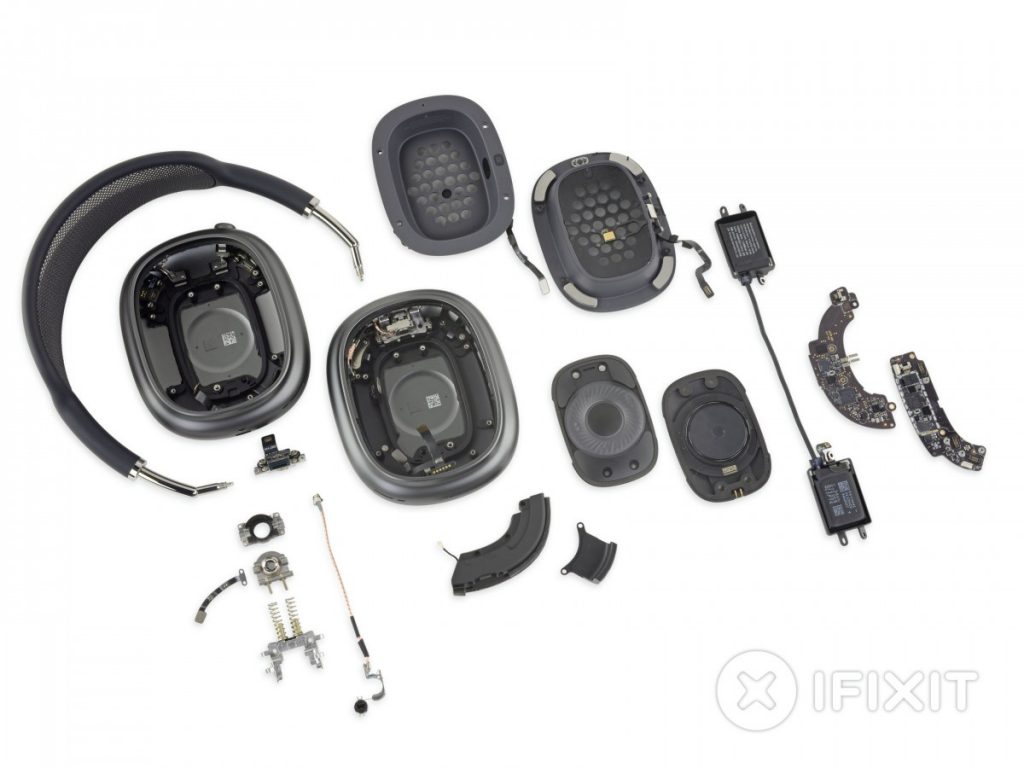
    iFixit has completed its extensive teardown of the Apple AirPods Max wireless headphones. The teardown has been in progress since the headphones went on sale and is now complete with a full list of all the chips onboard along with a teardown of the Sony WH-1000XM4 and the Bose Headphones 700 alongside for comparison.

    Here are some of the key takeaways from this teardown.

    • The grille for drivers is held by the typical Apple pentalobe screws. However, they are not meant to be turned all the way but rather half-way to release a locking wedge on the inside. Despite doing that, the grille won’t come off as it’s still held down by some glue.
    • The dual cell battery pack is located only on one side, the right side to be exact. Despite this, and the left side having no counterweight, the headphones seemingly aren’t unbalanced.
    • The battery has 2.54Wh capacity. The Sony 1000XM4 have 4.1Wh while the Bose 700 have 2.39Wh.
    • The hinge has a fairly elaborate and intricate electromechanical joint. This allows the hinge to transfer electrical signal without having cables running through the headband into the earcups.
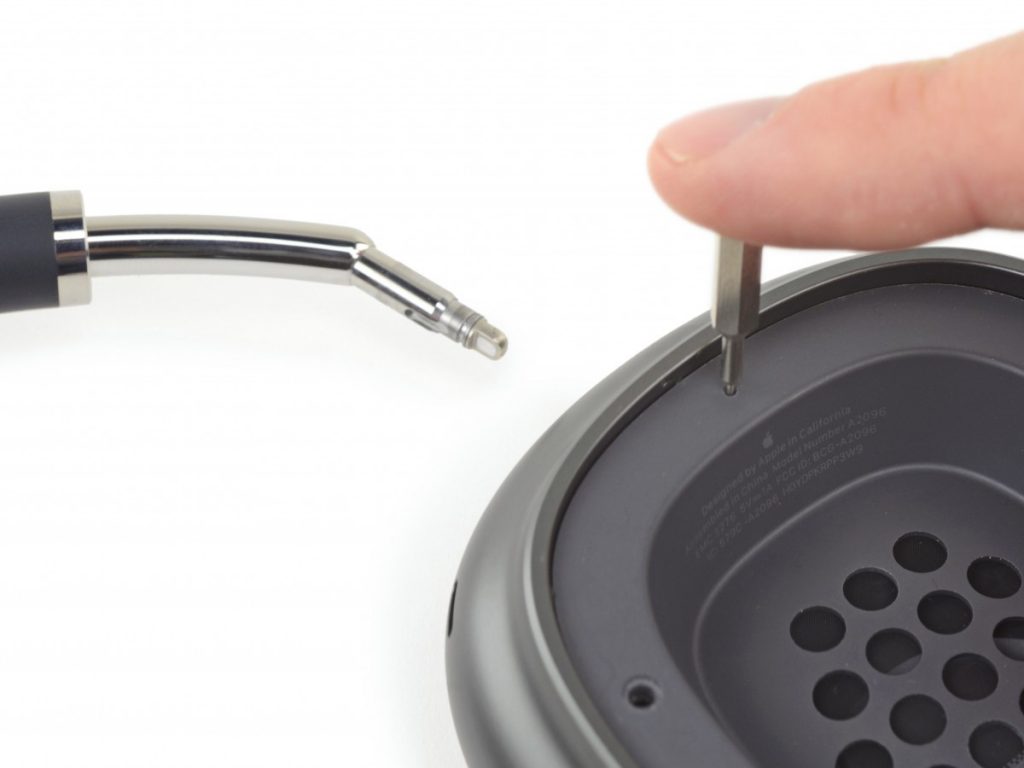
    • Perhaps the most interesting thing about this entire design is that headband plug into the earcups using what looks like a really thick Lightning connector. By pressing into a hole using a SIM ejector tool, you can just detach the earcup entirely from the headband.

    Overall, iFixit found the AirPods Max to be surprisingly serviceable, even though things like the glue under the grille and the choice of screws used make it tricky to do so. They gave them 6/10, which is their first non-zero score for an AirPods product.

    While compared to the Sony and the Bose alternatives, the Apple headphones exhibited superior craftsmanship in a way that almost justifies their $550 price and the internals make the other two headphones “look like toys in comparison”.

    You can check out the full teardown, along with the x-rays, videos, and chip details in the link below.

    8FansLike
    0FollowersFollow
    0SubscribersSubscribe