Windows 8 or 10 start menu not working?
Is the start menu not opening when you click on the start menu button?
Here are 6 things you can try to fix the problem.
Restart the Windows Explorer Process
1. Open Windows Task Manager.
Three ways to open Task Manager:
- Right-click on the taskbar and choose Task Manager.
- Right-click on the start menu button and choose Task Manager.
- Press the [CTRL] + [ALT] + [DELETE] keys on your keyboard and choose Task Manager.
2. Click on More details located at the bottom left of the Windows Task Manager window.
3. In the Processes tab, you right-click on Windows Explorer and choose Restart.
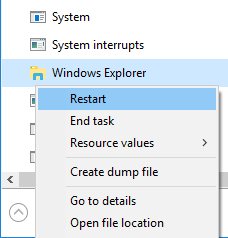
4. Close the Task Manager.
Deployment Image Servicing and Management Tool
1. Open Windows Command Prompt as administrator.
Three Ways to open Windows Command Prompt as administrator:
- Press the [Windows] + [X] keyboard keys at the same time and then click on Command Prompt (Admin).
- Right-click on the start menu button and then click on Command Prompt (Admin).
- Enter cmd in the Windows search bar or Cortana, then right-click on Command Prompt and choose Run as administrator.
2. When the User Account Control (UAC) window appears, you click Yes.
Note: Depending on your settings, you might need to enter your administrator password first and then click Yes.
The Command Prompt window will appear.
3. Type the following command and press Enter:
DISM.exe /Online /Cleanup-image /Restorehealth
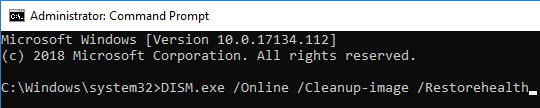
4. Wait until the command is finished and then you can close the Command Prompt window.
5. Restart your computer.
Windows Powershell
1. Open Windows PowerShell.
Three ways to open Windows PowerShell:
- Press the [Windows] + [R] key on your keyboard, enter powershelland then press Enter.
- Enter powershell in the Windows search bar or Cortana and then click on Windows PowerShell when it appears.
- Right-click on the start menu button and choose Command Prompt (Admin), then enter powershell and then press Enter.
2. Type the following command and press Enter:
Get-AppXPackage -AllUsers | Foreach {Add-AppxPackage -DisableDevelopmentMode -Register "$($_.InstallLocation)\AppXManifest.xml"}
3. Wait until the command is finished and then you can close the PowerShell window.
Note: Some errors may appear (in red), but you can ignore them.
System File Checker Tool
1. Open Windows Command Prompt as administrator.
Three Ways to open Windows Command Prompt as administrator:
- Press the Windows + X keyboard keys at the same time and then click on Command Prompt (Admin).
- Right-click on the start menu button and then click on Command Prompt (Admin).
- Enter cmd in the Windows search bar or Cortana, then right-click on Command Prompt and choose Run as administrator.
2. When the User Account Control (UAC) window appears, you click Yes.
Note: Depending on your settings, you might need to enter your administrator password first and then click Yes.
The Command Prompt window will appear.
3. Type the following command and press Enter:
sfc /scannow
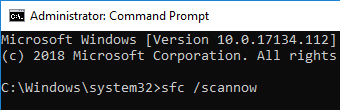
The System File Checker tool will scan all protected system files, and replace corrupted files with a cached copy.
This process may take a while.
4. Wait until the command is finished and then you can close the Command Prompt window.
Note: If the System File Checker tool is unable to fix corrupt files, then go to the following page: How to Solve the “SFC Unable to Fix Corrupt Files” Problem in Windows 10.
Batch File
1. Open Windows Notepad.
Two ways to open Notepad:
- Type notepad in the Windows search bar or Cortana and then click on it when it appears.
- Press the [Windows] + [R], in the Run box, you type notepad or notepad.exe and then press Enter.
2. Type (or copy and paste) the following lines in Notepad:
taskkill /f /IM explorer.exe
start explorer.exe
exit
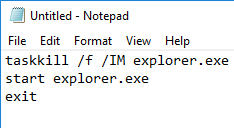
3. Click on File (top left) and choose Save As.
4. Select a location on your computer where you want to save the batch file (e.g., Desktop).
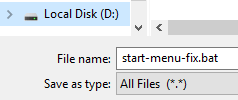
5. At File name, you enter a name for the batch file with an .bat extension at the end (e.g., start-menu-fix.bat).
6. At Save as type, you select All Files.
7. Click on the Save button.
8. Double-click on the batch file.
Windows 10 “Fresh start” Option
Sometimes the best thing you can do is to start fresh.
Fortunately, Windows 10 comes with a feature that allows you to reinstall and update Windows in just a few clicks. This feature is called “Fresh start”.
This feature will keep your personal files and some Windows settings, but it will remove your installed programs.
Before you start, you should first backup your files, and if you have paid software, then you should also retrieve and backup the license keys.
1. Open Windows Defender Security Center.
Three ways to open Windows Defender Security Center:
- Click on the Windows Defender icon located in the system tray.
- Type windows defender in the Windows search bar or Cortana and then click on it when it appears.
- Press the [Windows] + [R], in the Run box, you type C:\Program Files\Windows Defender\msascui.exe and then press Enter.
2. Click on Device performance & health.
3. Click on Additional info located underneath Fresh start.
4. Click on the Get started button.
5. Click on Next.
6. Follow the on-screen instructions to reinstall Windows.