More
    Home Blog Page 4

    Microsoft releases its Google Chrome-like Edge browser for testing

    0

    Microsoft, having given up on its own core browser technology, has released test versions of its Edge browser built instead on the same foundations as Google’s Chrome.

    “In these first builds we are very much focused on the fundamentals and have not yet included a wide range of feature and language support that will come later,” said Joe Belfiore, Microsoft’s corporate vice president for Windows, in a blog post Monday. “You’ll start to see differences from the current Microsoft Edge including subtle design finishes, support for a broader selection of extensions and the ability to manage your sign-in profile.”

    For years, Microsoft had tried to reclaim some of its browser power by stripping away the legacy technology that hobbled Internet Explorer and by releasing the modernized Edge instead. But it never caught on widely, and in December, Microsoft announced a plan to rebuild Edge on Chromium, the open-source underpinnings of Chrome that’s also used in several other browsers.

    You can download the software for Windows 10 computers from Microsoft’s Edge Insider site. Different versions of Chromium-based Edge can be installed and run side by side.

    The new version of Edge is based on Chromium, an open-source project run by Google. Other browsers that rely on Chromium include Brave, Vivaldi, Opera and Samsung Internet. Using Google’s software gives access to a mature and frequently updated software project while ensuring websites aren’t likely to suffer from incompatibility problems.

    However, it also means Google’s already formidable power over the web — deciding in effect which technologies are supported and which aren’t — is that much stronger. Chrome dominates the browser market.

    Apple’s Safari, a cousin to Chrome, and Mozilla’s Firefox remain independent.

    Microsoft’s Internet Explorer dominated browsing for years, but Firefox dented that power 15 years ago and injected new life into the technology, even as Microsoft let it languish. Chrome arrived a decade ago, built on the same WebKit core as Safari. But Google parted ways, creating a fork of WebKit called Blink that’s the core part of Chromium.

    By default, Chromium-based Edge sends search traffic to Microsoft’s Bing search engine, not to Google’s dominant search service. You can add other search engines if you want. Search traffic from browsers is an important financial consideration since they can lead to revenue from search ads.

    Microsoft Edge improvements to Chromium

    For now, the Chromium-based Edge is almost all Google’s code. But Microsoft plans to change that with contributions of its own, a potentially important shift in the dynamics of the Chromium community. So far, it’s contributed 275 changes to the Chromium project, Microsoft’s Edge team said in a separate blog post.

    Some changes will be more obvious to users. Microsoft promised its Chromium-based Edge will get several features in coming weeks, including a dark mode, a reader mode for decluttered web pages, grammar and translation tools, and smoother scrolling.

    Other changes are deeper under the hood. One big example is Microsoft’s work to build a version of Chromium-based Edge that runs on Windows laptops using 64-bit Arm processors, Belfiore said.

    Most Windows laptops use Intel processors, but Arm chips — notably those built by Qualcomm — are part of a sustained push to design laptops with longer battery lives and built-in connectivity to 4G and later 5G mobile networks. To make that successful, Arm-based laptops need a full suite of software.

    Microsoft also plans Chromium improvements in for touch-screen interfaces, video chat, graphics acceleration and accessibility — an important technology for people with vision or other disabilities.

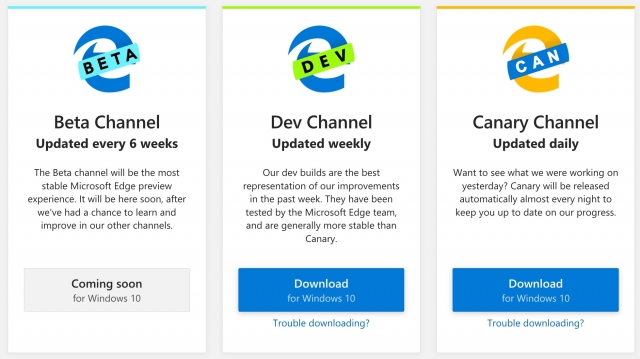
    The Chromium-based Edge builds available now change rapidly — daily for the Canary version and weekly for the Developer version. Later will come Beta and Stable releases that should be more reliable. Those names follow Chrome’s labeling conventions. The Canary name refers to the canary-in-the-coal-mine idea for keeping a constant eye on whether something is going wrong.

    This Clever Hack Will Change the Way You Find Music on Spotify

    0

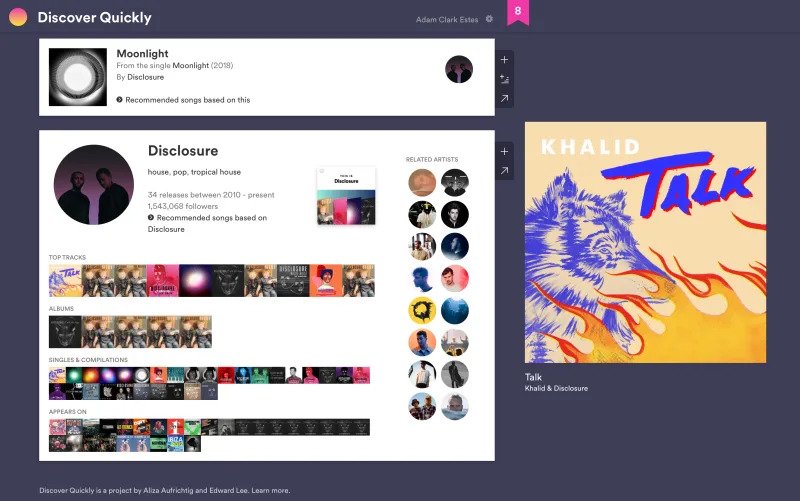
    My favourite thing about Spotify has always been music discovery. So when the company started building personalised playlists like Discovery Weekly and Release radar, I was hooked. The only problem was listening to all the new music takes forever. But an independent project from a couple of Spotify developers offers an amazing hack for exploring millions and millions of songs. They call it Discover Quickly.

    The new Discover Quickly web app brings up your Discovery Weekly playlist as a grid of album covers. When you mouse over one, the song starts playing halfway through, and you can click the album cover to zoom in on that particular song and artist. Clicking a track will also save it as a list that you can quickly export to Spotify as a new playlist. This effectively allowed me to curate my Discover Weekly playlist in a couple of minutes, instead of having to listen to the entire thing.

    That new browsing method doesn’t just work with personalised playlists either. You can basically pull up any playlist on Spotify and do the same hovering and clicking trick. Once you zoom in on any given track you can also zoom on the rest of that artists’ work as well as related albums. I found it pleasingly easy to fall into rabbit hole after rabbit hole of music, discovering all kinds of new stuff along the way. As the name implies, Discover Quickly supercharges the music discovery element that makes Spotify so great in the first place.

    “There’s very little in Discover Quickly that you can’t do on your regular Spotify app, but we chose to foreground the activity of traversing music quickly and visually,” Aliza Aufrichtig, designer at Spotify, told Gizmodo in an email. “One of the biggest additions from our original version is the ability to start your exploration in lots of different places.”

    It’s worth noting again that Discovery Quickly is not an official Spotify project, although Aufrichtig and her development partner Edward Lee did start working on it at Spotify’s annual Hack Week. Aufrichtig explained that she got curious about Japanese music and wanted a way to browse through a bunch of songs easily. Using the Spotify Web API, she pulled 30-second clips and album art from 1,000 Japanese albums, and after she saw how slick the ability to hover over an image and hear a song could be, the concept for Discover Quickly was born.

    “I showed it to Edward,” Aufrichtig said, “and he was like, ‘Whoa, cool, but I want more. What if you could go infinitely down a rabbit hole of music, like getting lost on Wikipedia? Like what if you see a related artist and then click on them and can explore further.’”

    The Wikipedia rabbit hole analogy is actually perfect. In practice, Discover Quickly can suck you in and take you to genres you never even realised existed, because they’re somehow linked to music you already like. And to make things even more fun, you can browse through songs almost as if you’re hovering over links to see where to go next.

    You can try Discovery Quickly for free right here after you connect the web app to your Spotify account. Don’t be surprised if you find yourself listening to genres like “shimmer psych” or “acid techno” all day long.

    How To Activate Windows 10 Pro 64-Bit Easily

    0

    In this article of I will show you simple way to activate windows 10 pro for free without using any software.


    As you all know, Windows 10 is the last version of Windows and explained that they will be focused on the development of powerful and new features under the guise of software updates instead of building a new version.

    This means there will be no Windows 11 version or edition in the future. So if you are thinking about an upgrade, this is the best time to get it.


    So once you install or upgrade to windows 10 then you need to activate as well to use it’s all built-in features and tools.


    For that you need to buy product key to activate windows 10 but in this article i will tell you very simple and working way to activate windows 10 pro for free and without any software.

    For Windows 10 Products Keys List : CLICK HERE

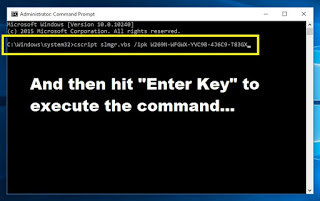
    Open “Command Prompt” as administrator and then execute below mention commands one by one :

    1 : cscript slmgr.vbs /ipk “Win10Pro-Key”

    and then hit “Enter Key” to execute the command…
    Note : “Win10Pro-Key” means type “Windows 10 product key”. If you have windows 10 pro then type windows 10 pro key instead of Win10Pro-Key. 

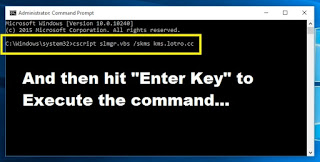
    2 : cscript slmgr.vbs /skms kms.lotro.cc

         and then hit “Enter Key” to execute the command…

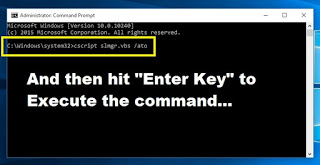
    3 : cscript slmgr.vbs /ato

         and then hit “Enter Key” to execute the command…

    Once all command execute successfully, It will prompt you message like “Product Activate Successfully” then it means your windows 10 is activated.

    Draytek Vigor 3900 Console Firmware Upgrade Procedure

    0

    My Hardware

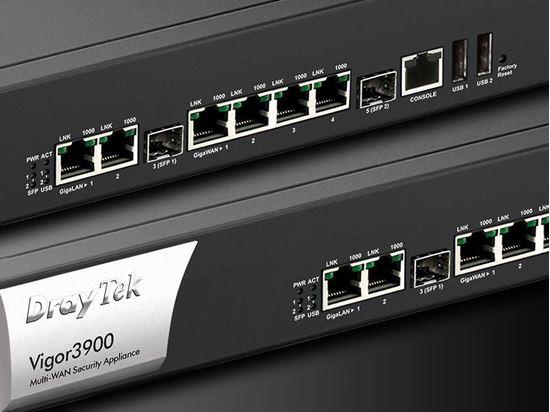
    • Draytek Vigor 3900 European Version
    • Hardware Version: 1.0
    • Firmware Version: 1.0.7.1

    I have decided to upgrade all the Draytek Vigor 3900’s in the business today and discovered an issue on the very first router. Upgrading the firmware using the ever so handy SYSTEM MAINTENANCE\FIRMWARE UPGRADE\ tool consistently failed with the error upgradeFailed_4 and the procedure halted.

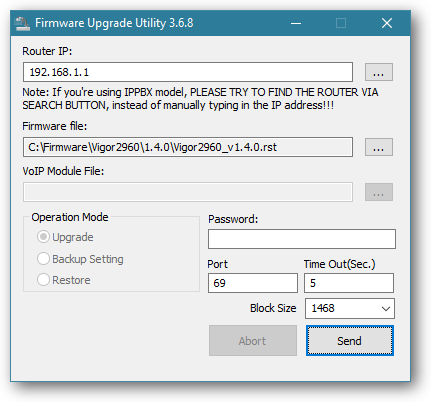
    So plan-b it is…after visiting draytek.co.uk and downloading the Draytek Firmware Utility version 3.6.8 I placed my router into TFTP mode [power down the router, hold in the Factory Reset button, keep it held down while powering on the router by the switch on the back, then once the front lights start flashing pressing Send on the utility.

    Please note on my router the ACT + USB 1 and 2 all flashed in sequence due to a really old Bootloader v1.0.7.1, once the router is upgraded correctly all future attempts at placing it into TFTP mode will resemble the picture above.

    This process appeared to work correctly, the router was automagicly rebooted.

    Until i logged back into the web interface…

    The router was still at version 1.0.7.1 /facepalm

    Plan-C time…contact Draytek support

    After allowing Draytek to login to my router and check it out they forwarded me a custom bootloader version 1.3.1 and advised me to flash the router using the Draytek Firmware Upgrade utility. This appeared to flash correctly and they confirmed it had worked so further advised me to flash firmware v1.4.3 which again failed..no error, no message nothing.

    The router was still hanging on for dear life to firmware 1.0.7.1 even with the upgraded bootloader.

    Draytek further advised me to console the router and attempt the firmware update from there.

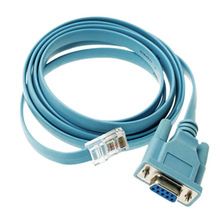
    After finding my console cable and RJ45 to Serial adapter in the Draytek box I proceeded to setup an old Windows 7 PC with a serial port to console into the router.

    Now to use the console method you need to follow these basic steps:

    Turn off any firewall or security products as they may interfere with the connection.

    Install a TFTP server such as Solarwinds TFTP Server on your Windows PC.

    Place your Draytek Firmware files in the TFTP Server folder i.e. c:\TFTP-ROOT\

    Install TeraTerm VT Client and configure it to use COM1 and set the port transfer speed to 115200 and leave it open.

    Attach both your LAN cable and console cable to the router.

    Start up the router in TFTP mode by powering it off, holding in the Factory Reset button and with the button held in power up the router.

    You will hopefully see the Draytek boot sequence on the TeraTerm console.Press Enter when seeing message [Press Enter in 5 sec]

    Input Router IP as 192.168.1.1, and press Enter

    Input TFTP server IP as Computer’s IP, and press Enter

    Input Bootloader file name V3K9BLv111.all, and press Enter

    Vigor will try to download the firmware from the TFTP server Wait and see if Vigor can upgrade the bootloader successfully.

    If yes, please try to upgrade firmware with same steps and see if you can upgrade Vigor3900 to the new firmware version.

    Troubleshooting

    If for any reason the flash fails due to incorrect MNT or volume not mounting, perform the following:

    Type command “nand erase”

    Wait for the “nand erase” process to finish  

    Upgrade with a .RST Firmware, if you do not have a firmware with .rst rename a .all .rst and use that.


    How to enable or disable hibernate in Windows 10

    0

    Need to clear up several gigs of disk space? Disable hibernate.

    Hibernation is a state you can put your computer in instead of shutting it down or putting it to sleep. When your computer hibernates, it takes a snapshot of your system files and drivers and saves that snapshot to your hard drive before shutting down. This allows your computer to start up faster, because it doesn’t need to re-establish those files and settings.

    Hibernate is enabled by default, and it doesn’t really hurt your computer, so it’s not necessary that you disable it even if you don’t use it. However, when hibernate is enabled it reserves some of your disk for its file — the hiberfil.sys file — which is allocated at 75 percent of your computer’s installed RAM. If you have 8GB of RAM, your hiberfil.sys file will take up 6GB of your hard drive space; if you have 16GB of RAM, your hiberfil.sys file will take up 12GB.

    So, the main reason you might want to disable hibernate on your computer is if you really need those extra gigs of hard drive space back. If you turn hibernate off, you won’t be able to use hibernate (obviously), nor will you be able to take advantage of Windows 10’s fast startup feature, which combines hibernation and shutdown for faster boot times.

    Here’s how to disable and then re-enable hibernate in Windows 10:

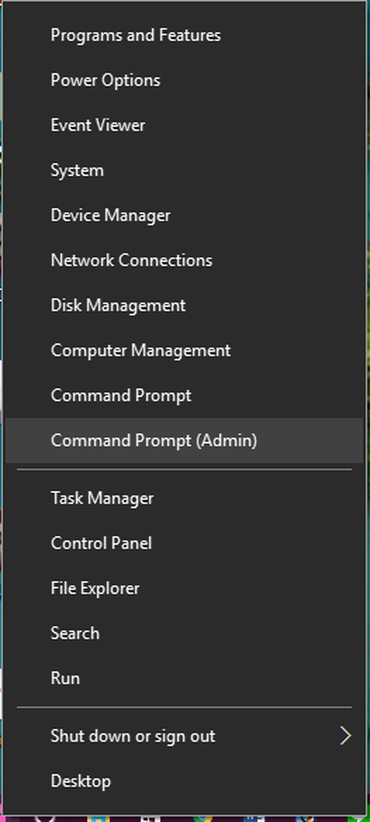
    1. Right-click on the Start button and choose Command Prompt (Admin) from the pop-up menu. If you are prompted by the User Account Control asking if you want to allow this program to make changes to your computer, click Yes to proceed.

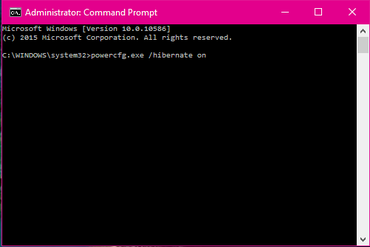
    2. In the Command Prompt window, type powercfg.exe /hibernate off and press the Enter key. Exit the Command Prompt window.

    3. To enable hibernate in Windows 10, open the Command Prompt again and type powercfg.exe /hibernate on and press the Enter key.

    ‘Star Wars: The Clone Wars’ to return on Disney’s streaming service

    0

    The original run of Star Wars: The Clone Wars ended after five seasons and a bundle of “Lost Missions” episodes on Netflix, but now the CGI series is coming back. Today at Comic-Con supervising director Dave Filoni made a surprise announcement that a new 12-episode season will arrive on Disney’s upcoming streaming service, complete with the poster above and a brief trailer.

    Disney CEO Bob Iger had promised a “few” Star Wars series in developmentfor the new service, and now it’s clear that this is one, joining a live-action show from Jon Favreau. The (still-canon) Clone Wars makes sense, with a fan base already set up and a storyline ready to pick up after its main character has just left the Jedi Order. Entertainment Tonight notes that in 2014, one of the writers told a fan that scripts for season seven and eight were already written, but it remains to be seen how long the revival will last.


    Windows: Fix Windows Error 1406 While Installing Software

    0

    Whenever trying to install any software on own PC or laptop, user can face some errors. It is not related to a specific application or software, but it can actually happen with any of it. One of the most common error behind these is Error 1406, setup could not write value to key. This error can occur on any device that uses Windows as operating system and most often occurs when someone tries to install a piece of software. This time we will take a closer look on a few methods on how to fix Windows error 1406 while installing software.

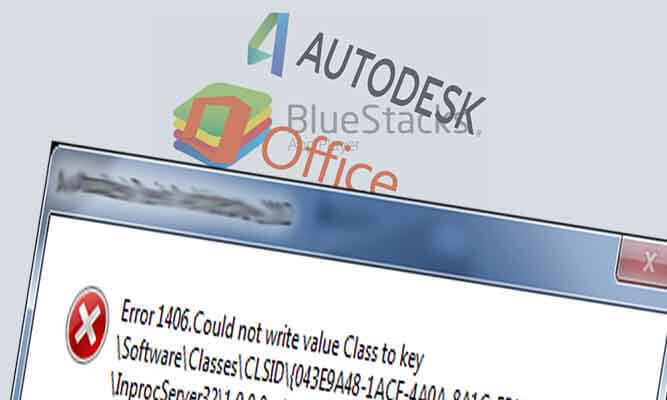
    This error code looks like this:

    Error 1406. Setup cannot write the value Assembly to the registry key.

    Error 1406. Could not write value Class to key.

    Methods to fix Windows Error 1406

    Below you will find a few methods to fix the error, so you have to perform them one by one.

    Method 1: Running the Application as Administrator

    Sometimes this error occurs due to the application running process. So at first, try to fix it by using this method:

    • Right click on the application .exe file;
    • Click on the option Run as administrator;

    Method 2: Perform a Clean Boot

    This error also can be fixed by performing a clean boot and re-installing the software.

    To perform a clear boot in Windows follow the instructions:

    • Windows Xp, Vista and 7
      • Log into your computer using Administrator rights (Administrator account).
      • Click on Start, type msconfig.exe in the Search box, and then press Enter.
      • Click on General tab, click on the Selective startup option, and then click on the option to clear the Load startup items.
      • Click on Services tab, click on the Hide all Microsoft services option, and then click on Disable all.
      • Finally, click OK and Restart.
    • Windows 8 and 8.1
      • Tap on Search.
      • Type msconfig, and then click on msconfig.
      • Click on General tab, click on the Selective startup option, and then click on the option to clear the Load startup items.
      • Click on Services tab, click on the Hide all Microsoft services option, and then click on Disable all.
      • Click on the Startup tab in task manager. Select Each Startup item and click Disable.
      • Close Task Manager and in the Startup tab of the System Configuration dialog box.
      • Finally, Click OK and Restart.

    Now, re-install the software after the reboot. It must work.

    If the issue still persist and you are still getting an error 1406 while installing Bluestacks, MS Office or some antivirus (or any other application), then try to perform the next method.

    Method 3: Provide full permission to software

    If even after you tried the methods above and the problem is not resolved or fixed, then you should try to give a full permission to the software. Sometimes the software doesn’t have full permission and is not able to complete the setup. Follow the steps below to provide a full permission:

    • Click on the Search Tab, and type regedit and press enter.
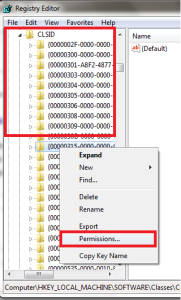
    • After opening the Registry Editor, On the left side list look for the location provided in the error status bar.
      • For Example – location shown in the error starts with Software\
      • Look for the HKEY_LOCAL_MACHINE\SOFTWARE\…
    • After locating the final location provided in the error, right click on the open folder that is present in the left side list. Click on Permission.

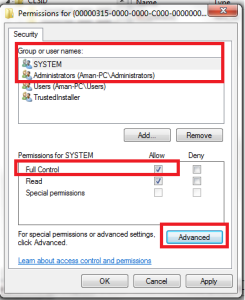
    • Select the Administrators group and now click under the Allow Checkbox in front of Full Control.
    • Select the SYSTEM group and verify that Full Control is selected under the Allow column.
    • In the permission dialog box, click on Advanced.
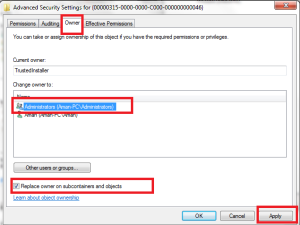
      Click on the Owner tab and select the Administrators group and the option Replace Owner On Subcontainers And Objects, and click OK.

    • Click on the Permissions tab –> select the option Replace all child object permission with inheritable permissions from this object.
    • Click OK.
    • Now Close all the window and try to re-install the application or software again.
    • If the problem still persist, Reboot the system and retry the installation.

    If the issue still persist and you are still getting an error 1406 while installing Bluestacks, MS Office or antivirus or any other application then try to perform the next method.

    Method 4: Use Fix it

    Fix it is the automatic troubleshooter application provided by Microsoft, it solves the issue automatically without any user involvement. Follow the steps below:

    • Download the Fix it application from here.
    • After installing and running the application, click on Run Now option in front of the Fix problems that programs cannot be installed or uninstalled.
    • It will automatically fix the Error 1406. Now enjoy running the installation.

    Windows: Start Menu Not Working?

    0

    Windows 8 or 10 start menu not working?

    Is the start menu not opening when you click on the start menu button?

    Here are 6 things you can try to fix the problem.

    Restart the Windows Explorer Process

    1. Open Windows Task Manager.

    Three ways to open Task Manager:

    • Right-click on the taskbar and choose Task Manager.
    • Right-click on the start menu button and choose Task Manager.
    • Press the [CTRL] + [ALT] + [DELETE] keys on your keyboard and choose Task Manager.

    2. Click on More details located at the bottom left of the Windows Task Manager window.

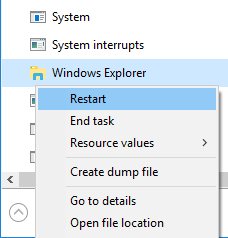
    3. In the Processes tab, you right-click on Windows Explorer and choose Restart.

    Restart the Windows Explorer process

    4. Close the Task Manager.

    Deployment Image Servicing and Management Tool

    1. Open Windows Command Prompt as administrator.

    Three Ways to open Windows Command Prompt as administrator:

    • Press the [Windows] + [X] keyboard keys at the same time and then click on Command Prompt (Admin).
    • Right-click on the start menu button and then click on Command Prompt (Admin).
    • Enter cmd in the Windows search bar or Cortana, then right-click on Command Prompt and choose Run as administrator.

    2. When the User Account Control (UAC) window appears, you click Yes.

    Note: Depending on your settings, you might need to enter your administrator password first and then click Yes.

    The Command Prompt window will appear.

    3. Type the following command and press Enter:

    DISM.exe /Online /Cleanup-image /Restorehealth

    4. Wait until the command is finished and then you can close the Command Prompt window.

    5. Restart your computer.

    Windows Powershell

    1. Open Windows PowerShell.

    Three ways to open Windows PowerShell:

    • Press the [Windows] + [R] key on your keyboard, enter powershelland then press Enter.
    • Enter powershell in the Windows search bar or Cortana and then click on Windows PowerShell when it appears.
    • Right-click on the start menu button and choose Command Prompt (Admin), then enter powershell and then press Enter.

    2. Type the following command and press Enter:

    Get-AppXPackage -AllUsers | Foreach {Add-AppxPackage -DisableDevelopmentMode -Register "$($_.InstallLocation)\AppXManifest.xml"}

    3. Wait until the command is finished and then you can close the PowerShell window.

    Note: Some errors may appear (in red), but you can ignore them.

    System File Checker Tool

    1. Open Windows Command Prompt as administrator.

    Three Ways to open Windows Command Prompt as administrator:

    • Press the Windows + X keyboard keys at the same time and then click on Command Prompt (Admin).
    • Right-click on the start menu button and then click on Command Prompt (Admin).
    • Enter cmd in the Windows search bar or Cortana, then right-click on Command Prompt and choose Run as administrator.

    2. When the User Account Control (UAC) window appears, you click Yes.

    Note: Depending on your settings, you might need to enter your administrator password first and then click Yes.

    The Command Prompt window will appear.

    3. Type the following command and press Enter:

    sfc /scannow

    The System File Checker tool will scan all protected system files, and replace corrupted files with a cached copy.

    This process may take a while.

    4. Wait until the command is finished and then you can close the Command Prompt window.

    Note: If the System File Checker tool is unable to fix corrupt files, then go to the following page: How to Solve the “SFC Unable to Fix Corrupt Files” Problem in Windows 10.

    Batch File

    1. Open Windows Notepad.

    Two ways to open Notepad:

    • Type notepad in the Windows search bar or Cortana and then click on it when it appears.
    • Press the [Windows] + [R], in the Run box, you type notepad or notepad.exe and then press Enter.

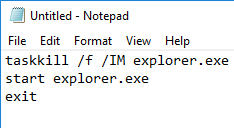
    2. Type (or copy and paste) the following lines in Notepad:

    taskkill /f /IM explorer.exe
    start explorer.exe
    exit
    

    3. Click on File (top left) and choose Save As.

    4. Select a location on your computer where you want to save the batch file (e.g., Desktop).

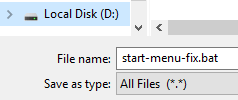
    5. At File name, you enter a name for the batch file with an .bat extension at the end (e.g., start-menu-fix.bat).

    6. At Save as type, you select All Files.

    7. Click on the Save button.

    8. Double-click on the batch file.

    Windows 10 “Fresh start” Option

    Sometimes the best thing you can do is to start fresh.

    Fortunately, Windows 10 comes with a feature that allows you to reinstall and update Windows in just a few clicks. This feature is called “Fresh start”.

    This feature will keep your personal files and some Windows settings, but it will remove your installed programs.

    Before you start, you should first backup your files, and if you have paid software, then you should also retrieve and backup the license keys.

    1. Open Windows Defender Security Center.

    Three ways to open Windows Defender Security Center:

    • Click on the Windows Defender icon located in the system tray.
    • Type windows defender in the Windows search bar or Cortana and then click on it when it appears.
    • Press the [Windows] + [R], in the Run box, you type C:\Program Files\Windows Defender\msascui.exe and then press Enter.

    2. Click on Device performance & health.

    3. Click on Additional info located underneath Fresh start.

    4. Click on the Get started button.

    5. Click on Next.

    6. Follow the on-screen instructions to reinstall Windows.

    USB Accessory Can Defeat iOS’s New “USB Restricted Mode” Security Feature

    0

    With the release of iOS 11.4.1, Apple has finally rolled out a new security feature designed to protect your devices against USB accessories that connect to the data port, making it harder for law enforcement and hackers to break into your iPhone or iPad without your permission.

    Dubbed USB Restricted Mode, the feature automatically disables data connection capabilities of the Lightning port on your iPhone or iPad if the device has been locked for an hour or longer, while the port can still be used for device charging.

    In other words, every time you lock your iPhone, a countdown timer of an hour gets activated in the background, which if completed, enables the USB restricted mode to prevent unauthorized access to the data port.

    Once the USB Restricted Mode gets activated, there’s no way left for breaking into an iPhone or iPad without the user’s permission.

    The feature would, no doubt, defeat law enforcement’s use of special unlocking hardware made by Cellebrite and Grayshift from attempting multiple passcode guesses via the iPhone’s Lightning port.

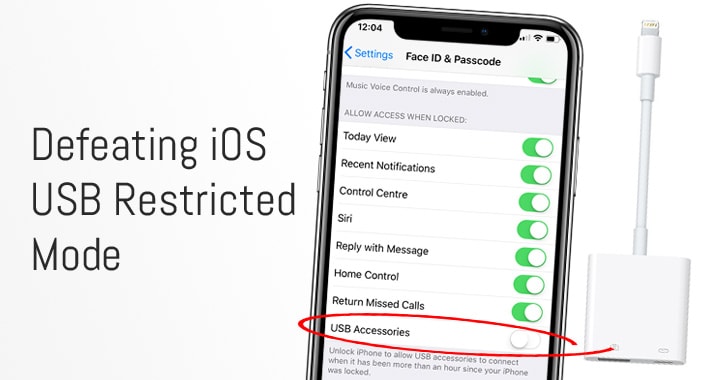
    Defeating Apple’s New “USB Restricted Mode” Security Feature

    However, security researchers from ElcomSoft have found a simple way that could allow anyone to reset the countdown timer of USB Restricted Mode to effectively defeat the purpose of the new security feature.

    According to the researchers, by directly connecting a USB accessory—such as Apple’s $39 Lightning to USB 3 Camera adapter—to a targeted iOS device within an hour after it was last unlocked would reset the 1-hour countdown.

    Activation of USB Restricted Mode can also be prevented even by using untrusted Lightning accessories, or those that have not been paired with the iPhone before.

    “In other words, once the police officer seizes an iPhone, he or she would need to immediately connect that iPhone to a compatible USB accessory to prevent USB Restricted Mode lock after one hour,” Afonin explains.

    “Importantly, this only helps if the iPhone has still not entered USB Restricted Mode.”

    ElcomSoft researchers are also experimenting with unofficial and cheap Lightning to USB adapters to see whether they, too, can extend the one-hour time limit.

    The issue doesn’t seem to be a severe vulnerability and looks like just a mistake on Apple’s part—”probably nothing more than an oversight,” and we hope that Apple would patch it shortly.

    In case you feel the need to immediately activate this USB Restricted Mode feature on their iOS devices before the countdown timer ends, just press the Power button five times.

    Two New Spectre-Class CPU Flaws Discovered—Intel Pays $100K Bounty

    0

    Intel has paid out a $100,000 bug bounty for new processor vulnerabilities that are related to Spectre variant one (CVE-2017-5753).

    The new Spectre-class variants are tracked as Spectre 1.1 (CVE-2018-3693) and Spectre 1.2, of which Spectre 1.1 described as a bounds-check bypass store attack has been considered as more dangerous.

    Earlier this year, Google Project Zero researchers disclosed details of Variants 1 and 2 (CVE-2017-5753 and CVE-2017-5715), known as Spectre, and Variant 3 (CVE-2017-5754), known as Meltdown.

    Spectre flaws take advantage of speculative execution, an optimization technique used by modern CPUs, to potentially expose sensitive data through a side channel by observing the system.

    Speculative execution is a core component of modern processors design that speculatively executes instructions based on assumptions that are considered likely to be true. If the assumptions come out to be valid, the execution continues, otherwise discarded.

    New Spectre-Class CPU Vulnerabilities

    A team of researchers—Vladimir Kiriansky of MIT and Carl Waldspurger of Carl Waldspurger Consulting—has now discovered two sub-variants of Spectre Variant one.

    The new Spectre variants come almost a month after researchers from Microsoft and Google disclosed a Spectre Variant 4 impacting modern CPUs in millions of computers, including those marketed by Apple.

    Spectre 1.1: Bounds Check Bypass on Loads

    Spectre Variant 1.1 is a sub-variant of the original Spectre Variant 1 that leverages speculative stores to create speculative buffer overflows.

    This buffer overflow issue in the CPU store cache could allow an attacker to write and execute malicious code that could potentially be exploited to extract data from previously-secured CPU memory, including passwords, cryptographic keys, and other sensitive information.

    “The ability to perform arbitrary speculative writes presents significant new risks, including arbitrary speculative execution,” the researchers wrote in their research paper.

    “It also allows attackers to bypass recommended software mitigations for previous speculative-execution attacks.”


    Spectre1.2: Read-only Protection Bypass

    Spectre variant 1.2 depends on lazy PTE enforcement, the same mechanism on which exploitation of Meltdown flaw relies.

    This flaw could allow a potential attacker to bypass the Read/Write PTE flags, which eventually will enable them to overwrite read-only data memory, code metadata, and code pointers to avoid sandboxes.

    “In a Spectre 1.2 attack, speculative stores are allowed to overwrite read-only data, code pointers, and code metadata, including vtables, GOT/IAT, and control-flow mitigation metadata,” the researchers said.

    Though ARM has also acknowledged the existence of Spectre 1.1 flaw in its blog post published today, the chip maker has not explicitly mentioned which ARM CPUs are especially vulnerable to Spectre 1.1 and Spectre 1.2. AMD has yet to acknowledge the issues.

    MicrosoftRed Hat and Oracle have also released advisories, saying that they are still investigating if any of their products are vulnerable to the new Spectre variants.

    “These issues are likely to primarily impact operating systems and virtualization platforms, and may require a software update, microcode update, or both,” said Oracle’s director of security assurance Eric Maurice.

    “Fortunately, the conditions of exploitation for these issues remain similar: malicious exploitation requires the attackers to first obtain the privileges required to install and execute malicious code against the targeted systems.”

    Intel thanked Kiriansky and Waldspurger for responsibility reporting the new vulnerabilities to the chip maker and paid out $100,000 to Kiriansky via its bug bounty program on HackerOne.

    8FansLike
    0FollowersFollow
    0SubscribersSubscribe